Saturday, January 29, 2011

A Couple More Challenge Cards

Here are a couple more cards.  This first one is for The Shabby Tea Room - Winter Wonderland.  I used the this sketch, added some distressing to the edges of the papers and did some quick stitching.  For the snowflakes cut craft foam with a Cuttlebug die and then covered them with chunky glitter.  The image is from Magic Moonlight.

Shabby Tea Room - Winter Wonderland
Paper Sundaes #53 - Distressing
Sunday Sketch and Stamp - Sketch
Tuesday Throwdown - Distressing
Crafty Purple Frog - Distressing

Stamps:  Verve Winter Wonder. Image from Magic Moonlight.
Paper:  MME Christmas Glitter, HOTP, Paper Studio
Ink:  Distress Inks
Accessories:  Cuttlebug, glitter, Spellbinders Labels Trio, sewing machine

A friend asked me to make a car for her boyfriend.  I used my Cricut to cut out the couple silhouette and the base.  I stamped the black heart with glue on Stampin Up French Flair background then sprinkled with glitter.  The red heart is attached on foam tape.  The base card is a 5.5" square easle card.  HOTP DP covers the card, which was inked around the edges and cut with deckle scissors.  Used an Inkadinkado stamp under the heart.  JustRite sentiment and border, cut out with Spellbinders.  Spellbinders Renaissance Hearts border, with some pearls on the bottom panel.

JustRite Friday Challenge - Love is in the air
Craft Your Days Away - Love

Stamps:  JustRite Romantic Sentiments and Just A Note border, Inkadinkado Garden Delight, Stampin Up French Flair
Paper:  The Paper Studio, HOTP.
Ink:  Colorbox Queues.
Accessories:  Cricut, glitter, foam tape, pearls, Spellbinders

Friday, January 28, 2011

Flutterby Mojo & Sailing Away

Here's another all white except for the main image card, this time for the Flutterby Wednesday challenge.  I used copper EP on the butterfly, cut out between some of the design, then curled the wings and attached it.  I really like how this turned out.  Lots of pretty shimmer without being over-the-top.

Flutterby Wednesday:  All white except for main image.
MojoMonday175:  Sketch.
Sweet Stampin:  Brown and one other color.

Stamps:  Inkadinkado Mindscapes.
Paper:  The Paper Studio, unknown glittery CS.
Ink:  Versamar
Accessories:  Spellbinders circle, Cuttlebug lattice dies, Sizzix embossing folders, embossing powder, homemade flowers, rhinestones, Glimmer Mist.

My second card today is a card I made for Father's Day.  My dad has been gone for 20 years (he's actually my step-dad but the only father I ever knew), but he was my hero and I still miss him terribly.  There are times when his passing seems so much more recent.  Every year on his birthday, Father's day, Christmas I take flowers and a card to his gravesight at Ft. Sam Houston National Cemetary.  He was a Korean War and Vietnam Vet.  He loved sailing, so this set is perfect.

I used Flourishes stamps, colored a bit on the ship with Prismacolor pencils and added Stickles to the waves.  Cut out image with Spellbinders deckled oval, sponged Distress Ink around the ship. Used a corner punch on the base CS and DP.  Flourishes challenge is to use hardware.  I have had these anchor buttons for many years.  I snipped off the back, gave them a "patina" with a Copic marker and attached them.  The ship's wheel is a Tim Holtz gear.  I had some flower stamens and I colored them with a Copic marker and attached them to the back of the gear, then attached it with a brad.  Looks like a wheel to me. : )

Flourishes Timeless Tuesday 102 - Use hardware.
Papertake Weekly - Sketch
Stamp With Fun - Blue and Brown

Stamps: Flourishes Antique Map and Guiding Light.

Paper: HOTP, The Paper Studio, Neenah Solar White,
Ink: Copic marker, Memento, Colorbox Queues.
Accessories: Spellbinders die, corner punch, Stickles, foam tape, button, Tim Holtz gear, flower stamens, brad.

Thursday, January 27, 2011

Mousy Note And a Whiff of Joy COTW

I haven't done a House Mouse card in ages, and I have a ton of the little critters.  I used the Tim Holtz brick wall folder on the background.  Other DP are scraps from my stash.  Mouse was colored with Copics, my first attempt - still needs lots of practice.  Cut out image with Spellbinders die, chalked around image while still in the die.  The little XO on his note and the sentiment are from Crafty Secrets, and the heart is from Rubber Stamp Tapestery set.

House Mouse challenge - Embossing.
Splitcoast Stampers - Sketch 317
Crafty Secrets SCS Forum - Have a heart
Craft Your Days Away - Love

Stamps: House Mouse "Maxwell's Note", Crafty Secrets "Glamour  Girls" and "Bonjour Merci".
Paper:  Kraft CS, stash scraps, Neenah Solar White
Ink: Copics, Memento, Colorbox Queues
Accessories:  Spellbinders, embossing folder


This next card follows the Midnight Madness sketch and also the Whiff of Joy color scheme of chocolate, teal and cream.  I had meant to use Distress Inks to color the image, but used the wrong ink to stamp it.  When the lines started to smear a bit I switched to Prismacolor pencils blended with baby oil.  Not the end result I wanted, but I still like it.  The snowflakes were cut from craft foam with a Cuttlebug die and glittered with ivory chunky glitter.  This card will be my personal quota for my Christmas card of the week (COTW)

Whiff of Joy - Chocolate, teal and cream. 

Stamps:  Whiff of Joy Willow With Lantern.
Paper:  GCD Studio "Scent of Christmas" and "Ella Blue", stash scrap, watercolor paper.
Ink:  Colorbox Queues.
Accessories:  Spellbinders Labels Six, glitter, craft foam, charms, Stickles.

Wednesday, January 26, 2011

Color Challenged Tag

Here's my next tag for Joan's weekly tag challenge.  My order from Joan arrived yesterday, and included this gorgeous die, so and I decided to use that as the base for my tag.  Our Creative Corner is having a color challenge, to use an analogous color scheme.  I searched the web for a color wheel with more colors then went with the paler hues.  I cut the base from an old greeting card (has some shimmer), embossed and used a Copic marker to stencil the embossed areas while still in the die.  The lady silhouette is from a Marianne D die.  I made the flowers, they look so pretty IRL.  I highlighted/edged them with a Copic marker then sprayed the layers with Glimmer Mist before assembling them.  They have a pretty shimmer.  Leaves are Martha Stewart punch.  Strung some beads on some eyepins and attached behind the flower.  The picture is not the greatest, I seem to have issues with lighting that I can't overcome.

Challenges:
Joan's Weekly Tag Challenge
Our Creative Corner - Analogous color scheme

Stamps:  None.
Paper:  The Paper Studio, sacrificed greeting card.
Ink:  Copic markers
Accessories:  Heartfelt Creations Decorative Window Scene Die, homemade flowers, Marianne D die, pearl, beads, MS leaf punch, Stickles.

Sunday, January 23, 2011

CSSC155 Birthday Wishes

The challenge on the Crafty Secrets Forum Challenge is to do a ONE LAYER creation using Crafty Secrets products. You can stamp the card base, add texture to it or punch it, but you can only add one image layer to the base.

I did this simple birthday card to have one hand, and I love how it turned out. The picture doesn't do it justice - I just can't seem to get good lighting for my photos.  I embossed the base with a CB folder.  Then I used a piece from Crafty Secrets Earthy paper pack and ran it through the same folder, then tore the edges.  I used the sentiment from Crafty Secrets Fairyland set, embossed it with copper EP.  I inked the edges of the base card and the layer with Vintage Photo Distress Ink, then attached the layer.  Added a little copper Stickles. 

Stamps:  Crafty Secrets Fairyland.
Paper:  SU! Sage Shadow, Crafty Secrets Earthy paper pack.
Ink:  Versamark, Distress Ink.
Accessories:  Cuttlebug folder, embossing powder, Stickles.

Flourishes FTTC101

Dee jackson is hosting the Flourishes Timeless Tuesday challenge this week.  She wants us to make a big card...5x7 or larger.  This one is 5x7.  I followed this week's sketch over on SCS used Flourishes "Santa, I Believe" set for the main image and the sentiment, cut/embossed with Spellbinders Labels Seventeen, inked in the die.  The CS is from MME Christmas Glitter pack.  I embossed the upper right portion of the base with Cuttlebug Allegro folder.  Edges of all pieces were inked with Aged Mahogany Distress Ink.  This also fills my personal challenge quota of a Christmas card a week.  : )

Stamps:  Flourishes "Santa, I Believe"
Paper:  MME Christmas Glitter Pack, Paper Studio CS
Ink:  Memories Sepia, Ranger Distress Ink
Accessories:  Foam tape, Dew Drops, Spellbinders

Friday, January 21, 2011

Joan's Gardens Weekly Challenge #3

As I was going onto Joan's blog to post my tag link (below this post), I saw that this week's Thursday Weekly challenge #3 is:

1.Make a box...any kind of box will work.....even an alter box (how about a box for your tags)
2. A flourish
3. A butterfly
4. Make a flower (alright...if you can't make one use one you have purchased).

I made this little trinket box.  It is 2 1/8" square.  I used cardboard backing from a paper pack to make box and covered it with paper from my stash, I have no idea what company.  The box closes with the ribbon...I put a tiny flat magnet under the brown paper and wrapped within the end of the ribbon.  The flower was made with several sizes of punches, misted with water, wadded and then the layers put together.  The butterfly is a Martha Stewart punch and the flourish is a Spellbinders die. Will also include in this week's Flutterby Wednesday Challenge - anything goes.

Joan's Tuesday Tag Challenge #3

I love tags, but for some reason haven't made many.  Joan over at Joan's Gardens started another challenge to create a tag a week, any occasion, so we'll have tags on hand when we need them.  So for her  Tuesday Tag Challenge #3 I made this tag.

The base of the tag was already embossed, a pale pearly green CS, that I got at Joann's.  The image is from Magic Moonlight, cut and embossed with Spellbinders die, sponged with Distress Ink while still in the die.  The edges of the base tag were also sponged with two different Distress Inks.  The flowers I made, and the branches are a Martha Stewart punch.

Thursday, January 20, 2011

Where I've Been, Where I Plan To Be (long post)

I've had a long absence from the craft blog world, though not intentional.  Long story short...My son painted the family room for me.  I painted the kitchen, put Venetian plaster on the walls in the breakfast room, as a backsplash behind the stove, over the tile around the fireplace, and a different color in the powder room to replace the wallpaper that was in there.  Then Chuck and I pulled up all the carpet downstairs and spent two entire days on our hands and knees sanding and scraping the plaster and paint that the contractors figured would never be seen.  After all that, we stained the concrete and applied several layers of sealer.  It's gorgeous! Then I was suddenly and unexpectly laid off  from my job on October 4.  Was hired November 29 by a law firm and I'm still trying to fit in there.  I've always worked in the medical field in one capacity or another since I was 15, so a law firm is definitely a stretch for me!

Here are the house pix, should be able to click on them to make them bigger if you'd like. 
Breakfast room (before) Girls night in. :)  Can see where I'm in process of removing wallpaper, the vertical blinds and mini blinds we replaced. 

Living/Dining room. This was after we had been sanding for more than 12 hours
   
Family room. Gray tile around fireplace I covered with venetian plaster, you'll see in after shot

Breakfast area all put together. New French doors, valances I made, new window blinds

Powder room with Venetian Plaster

Family room. Venetian plaster over the gray tile around fireplace, valances up.
     
Living/dining room, from the front door
 
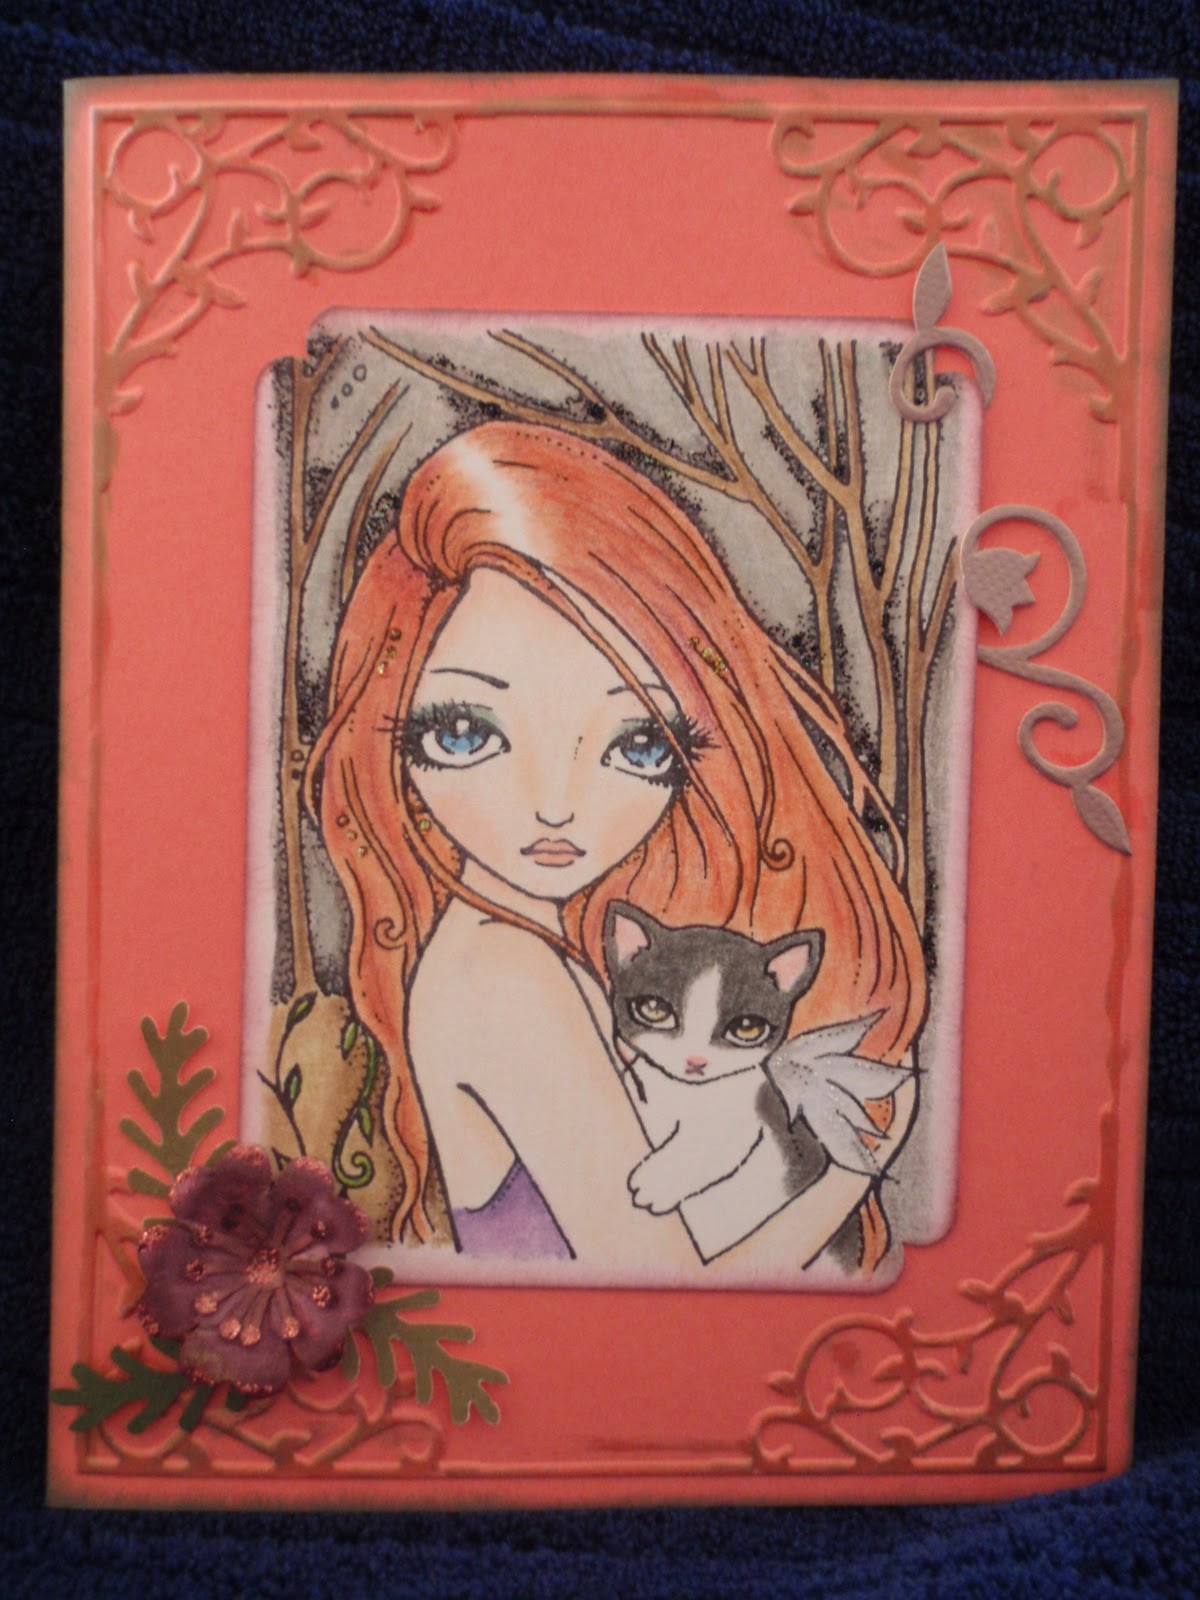
As far as crafting goes, here is a listing and pictures of what I have been up to.
Military Ball invitations for the JROTC program at my son's high school.  He is no longer in the program, but I have made the invitations for the last four years, they liked how I did them and they asked me to do them again.  This is my fifth and last year.  Their colors were purple and gold, theme was "Roman", so this is what I came up with.  I made 125 of these.
Beaded ornament covers. I did four different designs, five of each design in different colors. We had a Christmas party and I let the guests choose which ornament they wanted from the tree. They loved them!
Fleece jackets.  I made four of these, this is one for my daughter.  The other designs were Dallas Cowboys, Texas A&M and Black Watch plaid.
Mass Christmas Cards.  My mother and some of my friends depleted my stash of Christmas cards.  I never got around to making cards in time to send out to friends at Christmas but I did need a few for my family.  Also, a friend wanted quite a few clean and simple cards, so I did a mass production of these, there were 40 in the varied designs and colors

Christmas card I made for my mom.  Not a mistake on lower part of card, I forgot to take a picture before I signed it, so I "airbrushed" the words off the picture
 
Birthday card for my daughter, Shelbie

Birthday card for my niece
My daughter asked me to make a card for a friend of hers who got married New Years Eve.  She loved this card I made previously and asked that I make similar one in her friend's colors.

A friend of mine is a great salesperson but can't sew, so she asked if I would make microwave potato bags and she would sell them.  Pretty boring so I didn't include a picture...rectangular bag with patterned cotton exterior, layer of cotton batting, and white cotton inner layer.  I made 96 of them and she sold every one of them!  Then she asked me to design a wine tote bag that she could sell to the ladies in her bunco group.  They went over very well so she asked me to make more.  The pics above are what I designed. They have a little pocket for the corkscrew.  I also made some tags from shrink plastic on which I used a stamp from Crafty Secrets.  I attached some jump rings to a lobster claw which clips over the drawstring cord.  I made 72 wine bags and she sold all of those too!

So my plans for this year crafting wise are to participate in more card challenges, my first one being below.  Plan to re-start my personal challenge of making a Christmas card a week so I have enough cards by Christmas, and more varied designs.  Perhaps just a few 'mass' batches. :)  Also plan to do more beadwork in the form of ornaments and necklaces.  I have one major sewing project to finish by spring break, and I will post that when I can put it on my daughter to model. :)

If you're still reading this, thanks for hanging in there with me.  So now take a look at my first challenge this year in the post below.

Sweet Pea Mojo174

This is my first card challenge this year, and I managed to get this one to fit three challenges. 

1)  MojoMonday174. I turned the sketch on its side then flipped it.
2)  Sweet Pea Stampers: All white apart from the image.
3)  In a Sweet Pea Dream: "Under the Sea"...Use a mermaid or sea creature image.
4)  Simon Says Stamp Challenge Blog:  Bingo.  I used punches/dies, embossing, and ribbon (bottom row).

All of the white CS is Neenah Solar White. I used two different Cuttlebug embossing folders. The image is ching-chou kuik's Coral Immersion from Sweet Pea Stamps.  I've kind of become addicted to these georgeous fairy/fantasy style stamps! She is colored with Prismacolor pencils, with Stickles added.  The edges of the image and both embossed panels have been glittered.  The flowers are from a couple of Martha Stewart punches.


This is a close-up of the colored image.