Sunday, December 25, 2011

Wednesday, December 14, 2011
100th Challenge Blog Hop at The Pixie Cottage!!!!
It's a very special challenge at ThE PixiE CottagE this week as we are celebrating our 100th challenge!
To mark this special occasion we are having an "Anything Goes Christmas" challenge and also a blog hop for some very special prizes!
You should have come to me from Davi Long Reid and if not, then please go back to ThE PixiE CottagE so that you don't miss a spot on the hop.
You'll need to collect letters from all the blogs on the hop to be in with a chance of winning.
Also, you must leave a comment at all the blogs as each one is giving away a PixiE CottagE Digital Image so plenty of prizes to be had. The winner from my blog will be chosen from the comments, and will win a digital image of their choice!
Finally, when you get back to the ThE PixiE CottagE leave your name and link to your blog in the Inlinkz box for a chance to win a $20 Gift Certificate to Michelle's Scrapbooking! We'd love for you to enter with a Christmas card/project but if you are only entering the blog hop, please add BH after your name. Only one "Blog Hop Only" entry per person.
So now you just need to leave me a comment and then hop along to Tanya Johnson to carry on with the fun!
For this 100th challenge, I made this little banner.

I cut the backdrops and letters with my Cricut, embossed each backdrop with a Sizzix folder then edged each one with a gold DecoColor pen. The letters were cut from a thick gold metallic cardstock. I threaded each little pennant onto thin gold wire with a sparkly bead between each one. I colored the cute "Not Even a Mouse" Pixie Cottage image with Copics, cut it out and mounted it on Spellbinders Holly Motifs. I then suspended it with fine wire from the Merry banner. The poinsettias were made with Spellbinders Poinsettia Creations, with sparkly beads added to the centers. Below are close ups of the image and one of the poinsettias.


Stamps: Not Even a Mouse, by The Pixie Cottage.
Paper: The Paper Studio, not sure who made the gold CS.
Ink: DecoColor pen.
Accessories: Cricut, Spellbinders Holly Motifs and Poinsettia Creations, Stickles, wire, beads, Sizzix Snow Globe EF.
Wednesday, December 7, 2011
Last Minute Gift at The Pixie Cottage
The theme at The Pixie Cottage is last minute Christmas gifts and cards. As always there's a sketch you can follow as well.
You know how it is during the holidays...there's always one more little gift or trinket for something that comes up unexpectedly or last minute. Last year at this time I was the "newbie" at work and really didn't know anyone well at all. I chose not to participate in the name-drawing for Secret Santa gifts, because I didn't want anyone to feel obligated to buy something for someone they didn't know. There were two ladies that were very helpful with breaking me in and teaching me the ropes, and I made them each a little gift similar to this one pictured, just different colors and images. They loved them! :)
 One of those ladies needed some little gifts for her daughter's classmates and asked if I could make up 15 of the mugs with an image that kids would like, and I went straight for "To Santa From Buffy" by The Pixie Cottage. Last week I had stamped and colored a bunch of these images to use on Christmas cards. I just love the chubby little bunny! They have now been reappropriated; just need to color up a few more. You can get this stamp from Michelle's Scrapbooking.
Buffy is colored with Copics, then I cut around the image very closely and attached it to Spellbinders Deckled Classic Ovals which I lightly sponged with Distress Ink. I made the "mug"from Kraft paper, embossed some little swirls with copper EP. I then attached the oval to the front of the mug. Inside the mug are two different flavored packets of cocoa, mini marshmallows in the cellophane, and two skinny chocolate covered peppermint sticks (that somehow managed to hide behind the cellophane). Quick and easy little gift!
Stamps: To Santa From Buffy, by The Pixie Cottage.
Paper: Kraft CS, Neenah Solar White.
Ink: Copics, Distress Inks.
Accessories: Spellbinders Deckled Classic Oval, Stickles, Liquid Pearls, copper EP, ribbon.
You know how it is during the holidays...there's always one more little gift or trinket for something that comes up unexpectedly or last minute. Last year at this time I was the "newbie" at work and really didn't know anyone well at all. I chose not to participate in the name-drawing for Secret Santa gifts, because I didn't want anyone to feel obligated to buy something for someone they didn't know. There were two ladies that were very helpful with breaking me in and teaching me the ropes, and I made them each a little gift similar to this one pictured, just different colors and images. They loved them! :)

Buffy is colored with Copics, then I cut around the image very closely and attached it to Spellbinders Deckled Classic Ovals which I lightly sponged with Distress Ink. I made the "mug"from Kraft paper, embossed some little swirls with copper EP. I then attached the oval to the front of the mug. Inside the mug are two different flavored packets of cocoa, mini marshmallows in the cellophane, and two skinny chocolate covered peppermint sticks (that somehow managed to hide behind the cellophane). Quick and easy little gift!
Stamps: To Santa From Buffy, by The Pixie Cottage.
Paper: Kraft CS, Neenah Solar White.
Ink: Copics, Distress Inks.
Accessories: Spellbinders Deckled Classic Oval, Stickles, Liquid Pearls, copper EP, ribbon.
Wednesday, November 30, 2011
The Pixie Cottage Holiday Home Decor
The challenge this week at The Pixie Cottage is a little different. We want to see holiday banners, ornaments, etc... Or if you create a card, it must follow this week's sketch (below)
 I made this little wreath by stringing a bunch of jingle bells onto wire. The bow and curly tendrils are 1/4 metal strips I cut and curled. Few nicks on the fingers while manipulating it because the metal edges are sharp, but it turned out pretty. The leaves were in my stash, and I swiped a cotton ball with Distress Ink over them to give them a patina. I colored "To Santa From Buffy", available at Michelle's Scrapbooking, with Copics, cut around the image and suspended it in the center of the wreath. I have this hanging on the inside of my front door. Now I hear a pretty jingly sound when someone opens the door and there's no more sneaking up on me. :)
Challenges:
Simon Says Stamp - Anything Goes.
Stamps: To Santa From Buffy by The Pixie Cottage.
Paper: Neenah Solar White
Ink: Memento, Copics.
Accessories: Liquid Pearls and Stickles, jingle bells, wire, cording, thin metal sheet.

Challenges:
Simon Says Stamp - Anything Goes.
Stamps: To Santa From Buffy by The Pixie Cottage.
Paper: Neenah Solar White
Ink: Memento, Copics.
Accessories: Liquid Pearls and Stickles, jingle bells, wire, cording, thin metal sheet.
Wednesday, November 23, 2011
Pixie Cottage Challenge #97
Happy Wednesday all! Time for another challenge at The Pixie Cottage challenge blog. This week's theme is Make a Set. That could be something like a card and matching box, a set of tags or set of cards. There is also the sketch to follow, so you could choose to do the sketch as well.
 My daughter is getting married in March, and I made this set of tags for each of the five bridesmaid's gifts. I know, I'm way early with these, but there is a LOT still to be done. I used the Faith Sentiments stamp available at Michelle's Scrapbooking, cut and embossed with Spellbinders Scalloped Rectangle, and inked with Distress Ink. The tag was cut with my Cricut, using some metallic cardstock from Hobby Lobby. I made all the flowers (I'm getting better and quicker at making them) , except for the white one at the upper right. The leaves are from Marianne D dies. Added scraps of lace, some pearls, and crinkled seam binding.
Hope you join us this week for a fun challenge!
Stamps: Faith Sentiments by The Pixie Cottage.
Paper: Metallic paper from DCWV, Neenah Solar White.
Ink: Memento, Distress Ink.
Accessories: Cricut, seam binding, flat-back pearls, Marianne D die, Spellbinders die, lace, handmade flowers.
Challenges:
Craft Your Days Away - Embellisment bingo (pearls, flowers, ribbons).
Gingerloft - Lace, fabric or felt.
One Stitch at a Time - Anything goes.
Simon Says Stamp - Tag, You're It!
Cooking With Cricut - Bible verse or quote

Hope you join us this week for a fun challenge!
Stamps: Faith Sentiments by The Pixie Cottage.
Paper: Metallic paper from DCWV, Neenah Solar White.
Ink: Memento, Distress Ink.
Accessories: Cricut, seam binding, flat-back pearls, Marianne D die, Spellbinders die, lace, handmade flowers.
Challenges:
Craft Your Days Away - Embellisment bingo (pearls, flowers, ribbons).
Gingerloft - Lace, fabric or felt.
One Stitch at a Time - Anything goes.
Simon Says Stamp - Tag, You're It!
Cooking With Cricut - Bible verse or quote
Wednesday, November 16, 2011
Pixie Cottage Challenge #96
Whew...where are the days going? I can't believe next week is Thanksgiving! Over at the Pixie Cottage Challenge blog the theme this week is Family Thankfulness. There is also a great sketch to follow...so follow the theme, follow the sketch, or do both. But come play along with our challenge this week!
I need more Christmas cards, so I followed the sketch and used Sebastian the Snowman, available at Michelle's Scrapbooking. He is colored with Copics and has Stickles Frosted Lace on his feet. The corner embellies are Spellbinders Holly Motifs and the snowflakes are a Cuttlebug die. Gold Dew Drops for a final touch. Easy peasy.
 Stamps: Sebastian the Snowman from The Pixie Cottage.
Paper:
Ink: Copics.
Accessories: Spellbinders Holly Motifs, Cuttlebug snowflakes, Dew Drops, Stickles.
I need more Christmas cards, so I followed the sketch and used Sebastian the Snowman, available at Michelle's Scrapbooking. He is colored with Copics and has Stickles Frosted Lace on his feet. The corner embellies are Spellbinders Holly Motifs and the snowflakes are a Cuttlebug die. Gold Dew Drops for a final touch. Easy peasy.

Paper:
Ink: Copics.
Accessories: Spellbinders Holly Motifs, Cuttlebug snowflakes, Dew Drops, Stickles.
 |
| This week's sketch |
Wednesday, November 9, 2011
Pixie Cottage Challenge #95
This week at The Pixie Cottage challenge blog, the theme is Blue For a Boy. There's also a great sketch to follow, as always. I just go this new Pixie Cottage image by Alisa Ramirez called Not Even a Mouse, available here at Michelle's Scrapbooking. How CUTE is that little bear with the mice sleeping all over him!! I decided to follow the sketch this time, flipped it on its side.
 I colored the image with Copics and added Liquid Pearls to the fluffy parts of the hats. Cut and embossed the image with Spellbinders Labels Fourteen, edged it with a gold leaf pen. The little poinsettia and frilly diecut in the back are Spellbinders Holly Accents and Motifs. Used Cheery Lynn French Doily die on the green damask paper. Traced around the die and cut free hand for the matt, sponged the edges of both. All DP is The Paper Studio. Added the Dew Drops.
Stamps: Not Even a Mouse from The Pixie Cottage.
Paper: The Paper Studio.
Ink: Copics, Distress Inks.
Accessories: Dew Drops, gold lead pen, Spellbinders Labels Fourteen, Holly Accents and Motifs, Liquid Pearls.
 I colored the image with Copics and added Liquid Pearls to the fluffy parts of the hats. Cut and embossed the image with Spellbinders Labels Fourteen, edged it with a gold leaf pen. The little poinsettia and frilly diecut in the back are Spellbinders Holly Accents and Motifs. Used Cheery Lynn French Doily die on the green damask paper. Traced around the die and cut free hand for the matt, sponged the edges of both. All DP is The Paper Studio. Added the Dew Drops.
 Stamps: Not Even a Mouse from The Pixie Cottage.
Paper: The Paper Studio.
Ink: Copics, Distress Inks.
Accessories: Dew Drops, gold lead pen, Spellbinders Labels Fourteen, Holly Accents and Motifs, Liquid Pearls.
 |
| This week's sketch |
Wednesday, November 2, 2011
Jester Favor Box
Over the past several weeks I have been making flowers, punching different leaves, and cutting box bases from scraps of cardstock and DP in my stash. Even a lunch bag didn't stand a chance and got punched out for a couple different flowers. I spent several weeks before all the cutting and punching, planning 22 different little favor boxes, all for my daughter's wedding. She knows I love paper crafting and I love boxes and she asked if I could make a different favor box for each table. So I now have one each of 22 different boxes completely finished, and 7 more of each cut out and the flower parts and leaves and embellishments cut out and ready to assemble. I'll eventually get them all posted.
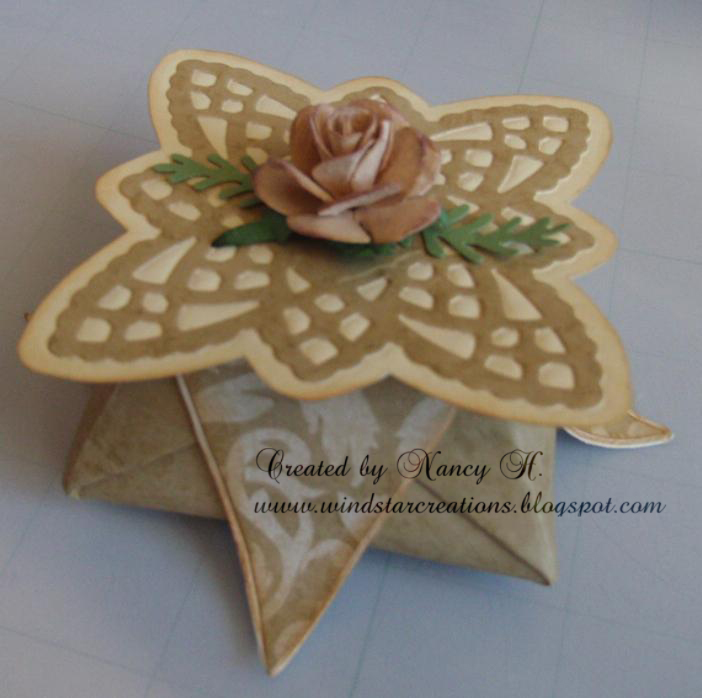
So anyway, as I was surfing through different challenges I came across the fancy folds challenge at Our Creative Corner and use your scraps challenge at Mark's Finest Papers. This is the box that fits both as it is a fancy fold and is made entirely from scraps in my stash. I call it Jester (yes, I'm a dork...I named each box). I went to a Montessori school for 9 years, entering public school at age 11. I have kept in touch with the teacher I had during those Montessori years, and when I graduated from high school she gave me a book on origami boxes and this box is one of them.

The base is a 6 1/2" square scrap I had in my stash, have no idea who the maker is but I got it at Hobby Lobby. Various folds got it to the box form, with little "flaps" on each side. It came out to 2 1/2" square. The flourished paper I also got at HL, and thankfully have enough scraps for all eight boxes.

Here's a view from the top. For the base of the lid I traced around the outside of one of the Spellbinders Lacy Doily Accents dies, cut it out by hand, and then embossed it with the same die. I did a die cut from the same die using the another scrap same as the base and glued it onto the base, so it has an inlaid look into the embossed based. I have seen different tutorials for Prima-like flowers around blog land, using the Retro Flower punch. I don't have that punch, so I searched my Cricut cartridges and cut the layers of the flower and the star base on my Cricut and made the flower. It's tan cardstock with a sponge bath of Milled Lavender Distress Ink. The fern leaves are a punch.


Mark's Finest Papers - Use your scraps
Stamps: None.
Paper: Stash scraps, from Hobby Lobby (not sure of maker).
Ink: Distress Inks.
Accessories: Spellbinders Lacy Doily Accents, Cricut, fern punch.
So anyway, as I was surfing through different challenges I came across the fancy folds challenge at Our Creative Corner and use your scraps challenge at Mark's Finest Papers. This is the box that fits both as it is a fancy fold and is made entirely from scraps in my stash. I call it Jester (yes, I'm a dork...I named each box). I went to a Montessori school for 9 years, entering public school at age 11. I have kept in touch with the teacher I had during those Montessori years, and when I graduated from high school she gave me a book on origami boxes and this box is one of them.
The base is a 6 1/2" square scrap I had in my stash, have no idea who the maker is but I got it at Hobby Lobby. Various folds got it to the box form, with little "flaps" on each side. It came out to 2 1/2" square. The flourished paper I also got at HL, and thankfully have enough scraps for all eight boxes.

Here's a view from the top. For the base of the lid I traced around the outside of one of the Spellbinders Lacy Doily Accents dies, cut it out by hand, and then embossed it with the same die. I did a die cut from the same die using the another scrap same as the base and glued it onto the base, so it has an inlaid look into the embossed based. I have seen different tutorials for Prima-like flowers around blog land, using the Retro Flower punch. I don't have that punch, so I searched my Cricut cartridges and cut the layers of the flower and the star base on my Cricut and made the flower. It's tan cardstock with a sponge bath of Milled Lavender Distress Ink. The fern leaves are a punch.

Just another shot with the lid askew so you can see the inside.

Underside of the top, with it's little lid that fits right inside the box.
Our Creative Corner - Fancy FoldsMark's Finest Papers - Use your scraps
Stamps: None.
Paper: Stash scraps, from Hobby Lobby (not sure of maker).
Ink: Distress Inks.
Accessories: Spellbinders Lacy Doily Accents, Cricut, fern punch.
A Pixie Cottage Christmas Card
Time to start adding more Christmas cards to you stash, and this week's theme at The Pixie Cottage is Christmas card. There is also a wonderful sketch to follow. So create a card using the theme or the sketch, or both, but come join us for this week's challenge! 
There are lots of wonderful Pixie Cottage stamps available at Michelle's Scrapbooking. For the Christmas card theme, I used the Winter Window image by Sandra Hammer. I colored it with Copics, sponged lightly around the edge with Aged Mahogany Distress Ink, and added some Stickles to the snow and tree. I stamped and cut out an additional tree, colored the same at the first one, and mounted it on foam dots. I followed the sketch and used DP from The Paper Studio. Sentiment was printed from my computer, cut/embossed with Spellbinders Double-Ended Tag and added the acrylic snowflakes.
Stamp: "Winter Window" from The Pixie Cottage.
Paper: The Paper Studio DP and CS.
Ink: Copics, Distress Ink.
Accessories: Stickles, foam dots, acrylic snowflakes.
Challenges
One Stitch at a Time: Christmas
Papertake Weekly: Anything goes
ABC Christmas Challenge: V for vintage.

There are lots of wonderful Pixie Cottage stamps available at Michelle's Scrapbooking. For the Christmas card theme, I used the Winter Window image by Sandra Hammer. I colored it with Copics, sponged lightly around the edge with Aged Mahogany Distress Ink, and added some Stickles to the snow and tree. I stamped and cut out an additional tree, colored the same at the first one, and mounted it on foam dots. I followed the sketch and used DP from The Paper Studio. Sentiment was printed from my computer, cut/embossed with Spellbinders Double-Ended Tag and added the acrylic snowflakes.
Stamp: "Winter Window" from The Pixie Cottage.
Paper: The Paper Studio DP and CS.
Ink: Copics, Distress Ink.
Accessories: Stickles, foam dots, acrylic snowflakes.
Challenges
One Stitch at a Time: Christmas
Papertake Weekly: Anything goes
ABC Christmas Challenge: V for vintage.
Wednesday, October 26, 2011
Going For Gold at The Pixie Cottage!
It's another Wednesday challenge at The Pixie Cottage. This week's theme is Going for Gold. There's also this wonderful sketch to follow. As always, you can choose the theme, follow the sketch, or do both! Hope you join us!
This week I decided to follow both theme and sketch. I used Hannah at a Fence, by Sandra Hammer, available at Michelle's Scrapbooking. Still need lots of practice, but I chose to color the image with Copics again. It is layered on cardstock and gold vellum. The background strips were embossed with a CB folder and layered over gold vellum background. The flowers I made, and the leaves are from a Crealies die. Added some gold Liquid Pearls to the corners of two of the panels.

Stamps: Hannah at a Fence from the Pixie Cottage.
Paper: Sand CS (scrap from my daughter's wedding invitation), vellum, SU! CS.
Ink: Memento, Copics, Colorbox Queues.
Accessories: Handmade "Prima" style roses, Crealies CL CS 11 leaf die, Cuttlebug EF from Oriental pack, Liquid Pearls.
This week I decided to follow both theme and sketch. I used Hannah at a Fence, by Sandra Hammer, available at Michelle's Scrapbooking. Still need lots of practice, but I chose to color the image with Copics again. It is layered on cardstock and gold vellum. The background strips were embossed with a CB folder and layered over gold vellum background. The flowers I made, and the leaves are from a Crealies die. Added some gold Liquid Pearls to the corners of two of the panels.

Stamps: Hannah at a Fence from the Pixie Cottage.
Paper: Sand CS (scrap from my daughter's wedding invitation), vellum, SU! CS.
Ink: Memento, Copics, Colorbox Queues.
Accessories: Handmade "Prima" style roses, Crealies CL CS 11 leaf die, Cuttlebug EF from Oriental pack, Liquid Pearls.
Wednesday, October 19, 2011
Sweet as Candy, Pixie Cottage #92
Time for another challenge at The Pixie Cottage! As always we have two parts to the challenge and you can choose either or both to play along with. We have a fabulous sketch and our theme this week is Sweet as Candy. I finally figured out how to merge digital images, and couldn't wait to use Mystical Mushroom digital image by ARTish, available at Michelle's Scrapbooking.
 Isn't that a cute image?!? It is a great background for the little fairy. The scene was colored with Copics. Added some Stickles to the swirlies. I cut/embossed the scene with Spellbinders Big Scalloped Circles, layered on top of In Spades Penant. DP is from Bearly Mine Designs. Flowers and leaves are Marianne D dies.
 Stamps: Mystical Mushroom, The Pixie Cottage; Summary Fairy, The Greeting Farm.
Paper: SU! CS, Bearly Mine Designs DP.
Ink: Copics, Colorbox Queues.
Extras: Stickles, Spellbinders Big Scalloped Circles and In Spades Penant, Marianne D LR0111 and LR0150, flat back pearls.

 Stamps: Mystical Mushroom, The Pixie Cottage; Summary Fairy, The Greeting Farm.
Paper: SU! CS, Bearly Mine Designs DP.
Ink: Copics, Colorbox Queues.
Extras: Stickles, Spellbinders Big Scalloped Circles and In Spades Penant, Marianne D LR0111 and LR0150, flat back pearls.
Wednesday, October 12, 2011
Dark and Spooky at The Pixie Cottage
It's another Wednesday (yay, two more days till the weekend!), and that means another challenge at The Pixie Cottage. Halloween is only a couple weeks away, and this week's challenge is Dark and Spooky. There's also another great sketch you can follow, or you can combine the sketch and the theme. I chose to go with a simple card layout again this time.
 I used this cute little Hannah Witch stamp, available at Michelle's Scrapbooking and More. She is colored with Copics. I drew the moon around the witch, which is from Inkadinkado, and then added PearlEx in splotches. The background was sponged with Distress Ink. Background DP is a freebie from Bearly Mine Designs. Sentiment I printed from my computer.
 I used this cute little Hannah Witch stamp, available at Michelle's Scrapbooking and More. She is colored with Copics. I drew the moon around the witch, which is from Inkadinkado, and then added PearlEx in splotches. The background was sponged with Distress Ink. Background DP is a freebie from Bearly Mine Designs. Sentiment I printed from my computer.
 Stamps: Hannah Witch from The Pixie Cottage, Halloween Trails by Inkadinkado.
Paper: Neenah Solar White, digital paper from Bearly Mine Designs.
Ink: Memento, Distress Inks.
Accessories: PearlEx.
Wednesday, October 5, 2011
Fall Fun With The Pixie Cottage
Okay, I'm back in gear now, have my Pixie Cottage DT card ready. This week's challenge at The Pixie Cottage is Fall Fun. There's also a great sketch to follow, or you can do both theme and sketch.
Isn't this a fun image! It's a digital image by the wonderfully talented ArTish called Barnie's Fall Ride, available at Michelle's Scrapbooking and More. I colored it with Copics and cut the octagon shape by hand, sponged the edges with Colorbox Queues. All the DP is from Prima First Blush collection. The sentiment was printed off my computer, cut out with SU tag punch and attached on foam tape. I followed this week's sketch and kept this pretty simple.
 Stamps: Barnie's Fall Ride digital image.
Isn't this a fun image! It's a digital image by the wonderfully talented ArTish called Barnie's Fall Ride, available at Michelle's Scrapbooking and More. I colored it with Copics and cut the octagon shape by hand, sponged the edges with Colorbox Queues. All the DP is from Prima First Blush collection. The sentiment was printed off my computer, cut out with SU tag punch and attached on foam tape. I followed this week's sketch and kept this pretty simple.
 Stamps: Barnie's Fall Ride digital image.
Paper: Neenah Solar White, Prima First Blush, The Paper Studio.
Ink: Colorbox Queues, Copic markers, Memento.
Accessories: Foam tape, round studs. :)
Wednesday, September 28, 2011
Pop It Up For The Pixie Cottage Challenge #89
It's Wednesday again, and that means it's time for another challenge at The Pixie Cottage! I did not get back in time from Vermont to get my card created to go live for the challenge, but will get it posted hopefully this evening here on my blog.
This week's theme is "Pop It Up!" You can interpret this in lots of ways, you could make a Pop Up Card, use foam dots to pop up areas, make an easel card, anything just as long as it pops! As always, there is also a second part to our challenges, which is a sketch. Here is this week's great sketch you can follow.

Follow the theme, the sketch, or get wild and follow both! Either way, come join us at The Pixie Cottage!
Saturday, September 24, 2011
My Brother's Birthday Cards
Hello from beautiful Vermont! We just finished a wonderful breakfast prepared by our lovely hostess and inn owner, Jane Doerfer. We are here to visit my daughter at Norwich University's Parent Weekend, and this is our 7th or 8th stay at the Green Trails Inn. We have seen quite a bit of the damage from the flood waters hurricane Irene devastated this pretty little state with, and Jane sustained some damage to the inn, but all seems to be getting back to normal as well as it can.
I have two birthday cards to post that I sent to my brother. This first one is from me, and I am using for the House Mouse Challenge. They are having a big birthday blog hop, and I would love to play along, but time is limited, so I'm just posting my card. I believe this image stamp is called "Popping Mouse", colored with Copics and Prismacolor pencils. Did some sponging around the edges, attached over Tuscan papers. The sentiment was printed from my computer, cut/embossed with Spellbinders Ovals. Added the metal corners after I "aged" them a bit with Copics.


I have two birthday cards to post that I sent to my brother. This first one is from me, and I am using for the House Mouse Challenge. They are having a big birthday blog hop, and I would love to play along, but time is limited, so I'm just posting my card. I believe this image stamp is called "Popping Mouse", colored with Copics and Prismacolor pencils. Did some sponging around the edges, attached over Tuscan papers. The sentiment was printed from my computer, cut/embossed with Spellbinders Ovals. Added the metal corners after I "aged" them a bit with Copics.

This next card is the one I made for our mother to give to my brother. I followed this week's Midnight Madness sketch. Used the Open Sea set from SU! as well as the nautical SU! papep. Lots of sponging and corner punching. The compass was embossed with gold EP, cut/dry embossed with Spellbinders Circles.

Both of these went together pretty quickly, and I really like how they turned out.
Heading home Monday night, and will be back at the craft table doing wedding decoration stuff for my daughter. Hope to get able to get more cards in as well.
Wednesday, September 14, 2011
Pixie Cottage Challenge #87
It's Wednesday...that means two more day till Friday! :) It also means time for another challenge at The Pixie Cottage. This week's challenge theme is Fussy and Fancy, and there's also a great sketch to follow. You can choose theme or sketch, or both! I was going to do both, but not sure I came out so well with the fussy and fancy, but I flipped the sketch on its side and followed it. I used the digital image "Feather" from Michelle's Scrapbooking, colored with Copics, then cut/embossed with Spellbinders Labels Six die. That was layered onto Spellbinders Scalloped Square which I embossed with a Cuttlebug folder. I printed the sentiment from my computer, cut/embossed it with Spellbinders Oval die. The roses are from Wild Orchid. Added a couple curly ques and some rhinestones.
 Stamps: "Feather" digi image by Artish.Paper: SU! CS, unknown DP from stash.
Ink: Memento, Copics, Colorbox Queues.
Accessories: Spellbinders Labels Six, Scalloped Squares and oval dies, Wild Orchid roses, rhinestones, CB embossing folder, Stickles.
 Stamps: "Feather" digi image by Artish.
Ink: Memento, Copics, Colorbox Queues.
Accessories: Spellbinders Labels Six, Scalloped Squares and oval dies, Wild Orchid roses, rhinestones, CB embossing folder, Stickles.
Sunday, September 11, 2011
A House Mouse Recipe Card
Oh my gosh...I've had this card made for a week, but kept forgetting to take a picture of it and post it. Between working on stuff for my daughter's wedding in the evenings, and this past week dealing with two attorneys on my own at work because each of their paralegal's were on vacation...my mind took a vacation of its own and forgot a few things. Then had camera issues. Just got back from a [WONDERFUL] weekend at the beach and there it was, so I took a quick picture with my cell phone, so sorry for the not too great quality. Had to get in on the House Mouse challenge! :)
The challenge this time around on the House Mouse Challenge was to create something with a recipe on it. This recipe for chai tea is yummy and I thought this image was perfect to go on the card. I colored it with Copics, added some Liquid Pearls and Stickles. The tea tag says "rose hips" on the stamp, but I masked that off, then wrote on the tag with a Copic fine liner. Used bundled sage to stamp the vines onto a scrap of sage green SU! paper I still had left in my stash, then layered that onto another piece of SU! CS on which I used the MS Swirling Lace punch around the page.

The challenge this time around on the House Mouse Challenge was to create something with a recipe on it. This recipe for chai tea is yummy and I thought this image was perfect to go on the card. I colored it with Copics, added some Liquid Pearls and Stickles. The tea tag says "rose hips" on the stamp, but I masked that off, then wrote on the tag with a Copic fine liner. Used bundled sage to stamp the vines onto a scrap of sage green SU! paper I still had left in my stash, then layered that onto another piece of SU! CS on which I used the MS Swirling Lace punch around the page.

Paper: SU! scraps, Neenah Solar White
Ink: Memento, Copics.
Accessories: MS Swirling Lace punches, Liquid Pearls, Stickles.
Never Forget...
We shall never forget
We shall keep this day,
We shall keep the events and the tears
In our minds, our memory and our hearts
and take them with us as we carry on.


We shall keep this day,
We shall keep the events and the tears
In our minds, our memory and our hearts
and take them with us as we carry on.
Wednesday, September 7, 2011
Mellow Yellow at Pixie Cottage
 It's time for another challenge at The Pixie Cottage. The week's challenge is "Mellow Yellow". As always, there are two parts to the challenge...a great sketch and/or the theme. You can do either or both. This week I again chose to go with the theme, and again I used this adorable Hannah on Bench stamp available at Michelle's Scrapbooking. I just love this image. I colored her with Copics, cut/embossed the image with Spellbinders Labels Small. I followed the sketch at Midnight Madness. The background DP is HOTP, scraps from my stash. The upper portion was embossed with a new folder from The Paper Studio. Added some yellow Stickles and a few flowers and all finished with this cutie.
 Challenges
Midnight Madness - Sketch
Papertake Weekly - Anything Goes
Mark's Finest Papers - Bring on the Bling
Stamps: Hannah on Bench from The Pixie Cottage
Paper: HOTP, SU!
Ink: Memento, Copics
Accessories: Spellbinders Labels Small, Wild Orchid roses, Kort and Godt flowers, Stickles, "intricate swirl" embossing folder from The Paper Studio.
Wednesday, August 31, 2011
Are My Colors Giving Me Away?
Can you tell I want fall to get here and bring cooler temperatures!? We had 107 and 110 degrees here this past weekend. This is crazy. But here we are with another Wednesday coming around, which means it's time for another challenge at The Pixie Cottage! This week's theme is back to school, and there's also this wonderful sketch to follow. Do one or the other, or do both. I followed the sketch, using "Pumpkin Bench" by Sandra Hammer, available at Michelle's Scrapbooking. I colored it with Copics, cut/embossed with Spellbinders Deckled Oval die. The little pots and flowers are a Rubber Stamp Tapestry set. All paper is MME.
 Challenges:
Crazy 4 Challenges: Male themed card.
One Stitch At a Time: Halloween or fall theme.
Cards For Men: "G"...Goodbye summer. Thank you Mandy! :)
Creative Card Crew: Anything goes
Stamps: "Pumpkin Bench" from The Pixie Cottage, Rubber Stamp Tapestry "Pottery Garden".
Paper: My Mind's Eye "Home" pack, The Paper Studio.
Ink: Copics, Colorbox Queues.
Accessories: Spellbinders Deckled Oval, seam binding, leaf charms.
 Challenges:
 Crazy 4 Challenges: Male themed card.
One Stitch At a Time: Halloween or fall theme.
Cards For Men: "G"...Goodbye summer. Thank you Mandy! :)
Creative Card Crew: Anything goes
Stamps: "Pumpkin Bench" from The Pixie Cottage, Rubber Stamp Tapestry "Pottery Garden".
Paper: My Mind's Eye "Home" pack, The Paper Studio.
Ink: Copics, Colorbox Queues.
Accessories: Spellbinders Deckled Oval, seam binding, leaf charms.
Subscribe to:
Posts (Atom)