skip to main |
skip to sidebar
 Today's Papercraft Planet Saturday Sketch Challenge is another fun one. Background DP is from Memory Box Winterberry pad. I embossed acetate with the Winter House CB folder then cut it out with a circle Nestabilities. I put some Diamond Glaze around the edge and rolled it in chunky glitter, also glittered the snowy part in front of the houses. I attached that to the shimmery blue DP I cut with Labels One, attached that stack to the background. Used MS branch punch (have had it for weeks and ignored it, now can't get enough of it) on some scraps of vellum, inked and blotted them. The snowflakes are from my ever trusty CB die, covered with chunky glitter and a little rhinestone in the center and then attached on top of the branches. The sentiment is Stampin Up! Wonderful Words II. Looks like snow on the houses and smoke coming from the chimneys, but that is how the acetate embossed. Cool, huh? :)Stamps: Stampin Up! Wonderful Words II.Paper: Memory Box Winterberry, The Paper Studio CS, vellum.Ink: Colorbox Queues.Accessories: Cuttlebug folder and die, Nestabilities, MS branch punch, rhinestone, glitter, Diamond Glaze.
Sharon's challenge this week is to do a card with fun folds. Anything but the ordinary, everyday  side or top opening. This one is a triangular trifold. Was super easy, which is what I needed after this week feeling pretty yuck. Chose lavender CS for my base. I have no idea who made the DP. I just looooove it and have been holding onto it because I can't remember where I got it and didn't want to use it all up. Finally broke into it. I used the new Labels Two die to cut the center piece. It is actually a paint chip from Lowe's, just the right size for this die. :) Has a bit of a metallic sheen. I didn't really feel like doing any stamping (I know...*~gasp!~*), so did some rummaging and came up with this metal medallion I got in the jewelry section at Hobby Lobby. Poifect. Added those antique brass photo anchors with matching brads, because I didn't have any ribbon
  that could do that focal piece justice. :)Here it is open. It's a really simple design. Instructions can be found on Scor-Pal site.
Stamps: NonePaper: SU! cardstock, ?? DS, paint chip.Ink: None.Accessories: Scor-Pal, Nestabilities, jewelry finding, photo anchors, brads
Boy have I had my days mixed up this week, kept thinking Tuesday was Monday, etc. Finally have it straight, I think. Hasn't been one of my better weeks. Was supposed to start 3rd round of chemo couple weeks ago but postposted when I lost my job. Well, not really...was just put on indefinite "I dunno how long" status. Didn't need the physical on top of emotional stress. Started another job this past Monday, so relaxed and started the chemo Tuesday. Bleh. Roller coaster of up and down emotions...don't want to do this, don't like this, my face is over the commode again, can I get through this, how much hair will I lose this time, why is the cat staring at me that way... As far as paper goods this week, I've been working on 200 invitations for my son's JROTC Military Ball coming up in December. I had made them last year as well and must have done an okay job because they asked me to do it again. The  Military Ball is like a prom for the JROTC cadets. They guys dress in their Class B uniforms, the girls in formals. There is a traditional Army Dining In ceremony, the grog bowl, then a dance. It's very nice. This will be my 5th year to chaperone. So here's the invitation. Burgundy CS (there is it again, see previous post), run through with CB D'Vine Swirls. Black Nestabilities oval stamped and gold embossed with numbers I cut from craft foam using CB dies and mounted to use as a stamp. Gold vellum for the theme cut with decorative scissors. My friend Deborah came over and helped me with these this week. She cut out some ovals, did some of the CB embossing, and cut the cord for the tassel and tied knots. Once we got all the pieces cut, embossed, etc., became more of an assembly line type process and went
  pretty quickly. The inside has the info printed on white opaque vellum, then tied with the cord. Pretty simple stuff...just a lot of it. Stamps: Homemade numbers from CB die.Paper: CS and vellum from The Paper Studio.Ink: Laser printer.Accessories: Nestabilities, Cuttlebug, embossing powder, cording, decorative scissors.
 Last year was the first year I sent a Halloween card to some of my girlfriends; several asked what this year's was going to be, so I guess a tradition has been started. :) I came across this sentiment in a magazine on the plane to Vermont a couple weeks ago and had to write it down. This Fluffles stamp was what came to mind to go with it. I decided on the stair step card so that Fluffles and the sentiment would show at the same time. I used Cuttlebug Distressed Stripes folder on the front panel, then added some punched out leaves and pumpkins, applied some chalk over the pumpkins. Printed the sentiment from my computer then cut out and embossed with Nestabilities rectangle, edged with some chalks. The ghost,bats and tiny leaves are all from the same punch as the pumpkins. The ghost was edged with silver ink and attached with tiny foam dots. The bats are glued onto a thin strip of acetate and attached behind the sentiment so they stand out from the background. The moon was cut from a circle Nestabilities, painted with Shimmering H2O's, and then sprinkled with glitter in some spots for extra sparkle. Fluffles was colored with Prismas...even has the green "face paint" listed in the sentiment. Added some Stickles to the hat band. Stamps: Fluffles Broomstick.Paper: The Paper Studio CS, My Mind's Eye DP.Ink: Stazon. Prismacolor pencils. Accessories: Nestabilities, leaf punch from Target $1 spot, mystery punch, Shimmering H2O's, chalks, glitter, foam dots, acetate, Cuttlebug, Stickles.
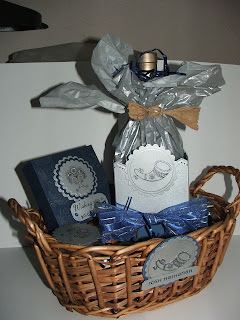 This is the gift I made for my friend (about a week or so late) for Rosh Hashanah. I cased this set by Lauren; I thought it would be perfect for my friend. I used the Mazel Tov set from Papertrey Ink for all the stamped images. This is actually a second set I made. A friend saw the original set when she came by to drop some things off and said I had to add apples and honey, which I had left out because I'm shipping this to Miami. My light bulb came on and I realized she is Jewish ... something that had never come up before. A silly grin later and she was walking out the door with the original set, minus that little pizza box which has a set of notecards for the originally intended recipient. : ) So I got another bottle of wine, made another set, and included apples and honey this time. There is also a candle in there (right in front of the box). Will wrap this in some shrink wrap and off it goes to Miami!Stamps: Papertrey Ink Mazel Tov. Flourishes and JustRite (below).Paper: The Paper Studio CS, Making Memories silver CS.Ink: Stazon, Colorbox Queues. Accessories: Nestabilities, rhinestones, dimensionals, border punch, wine.
 Before I forget...here is one of the notecards that I made that is inside the pizza box. You can see a closeup of the pizza box in yesterday's post. I made 8 cards and envelopes, and they all fit in there nicely, even with the dimensionals popping up the monogrammed circle. Used Flourishes Damask background and cut out with square scalloped Nesties. Then stamped the monogram with JustRite stamper, cut that out with circle Nestabilities and popped it up on dimensionals. Added the little rhinestone blingage between her initials to match those on the box. :)
 I love looking at Sharon Johnson's blog every morning and have been trying to get brave enough to attempt a challenge. I thought this Stamp Simply Challenge would be a good one to jump into for my first try. We are to Cuddle Up With Tammy (Tammy Hershberger ) to create a warm and cozy card. I got to bring my sewing machine forward on my table for this one. I hope this card will do. All my paper is from Hobby Lobby. The ribbon was a spool in the $1 bin at Michaels. The cute little buttons are from Michael's too. They came in a package in the most gorgeous muted colors! I attached the ribbon, stitched a wavy straight stitch all the way around the card and over the ribbon, then attached the buttons. The teacup is by Inkadinkado, stamped in Burnt Copper Colorbox, then cut out with an oval Nestie and then a scalloped one. While the oval was still in the die, I attempted to create somewhat of a vignette effect with the Ruby Satin and Gold Brocade. Stamps: Inkadinkado Vintage Teacup.Paper: Paper Studio CS, My Minds Eye DP.Ink: Colorbox Burnt Copper, Ruby Satin, Gold Brocade.Accessories: Nestabilities, ribbon, buttons, sewing machine.

 Today's Papercraft Planet Saturday Sketch Challenge is another fun one. Background DP is from Memory Box Winterberry pad. I embossed acetate with the Winter House CB folder then cut it out with a circle Nestabilities. I put some Diamond Glaze around the edge and rolled it in chunky glitter, also glittered the snowy part in front of the houses. I attached that to the shimmery blue DP I cut with Labels One, attached that stack to the background. Used MS branch punch (have had it for weeks and ignored it, now can't get enough of it) on some scraps of vellum, inked and blotted them. The snowflakes are from my ever trusty CB die, covered with chunky glitter and a little rhinestone in the center and then attached on top of the branches. The sentiment is Stampin Up! Wonderful Words II. Looks like snow on the houses and smoke coming from the chimneys, but that is how the acetate embossed. Cool, huh? :)