Wednesday, November 30, 2011

The Pixie Cottage Holiday Home Decor

The challenge this week at The Pixie Cottage is a little different.  We want to see holiday banners, ornaments, etc...  Or if you create a card, it must follow this week's sketch (below) 
I made this little wreath by stringing a bunch of jingle bells onto wire.  The bow and curly tendrils are 1/4 metal strips I cut and curled.  Few nicks on the fingers while manipulating it because the metal edges are sharp, but it turned out pretty. The leaves were in my stash, and I swiped a cotton ball with Distress Ink over them to give them a patina.  I colored "To Santa From Buffy", available at Michelle's Scrapbooking, with Copics, cut around the image and suspended it in the center of the wreath.  I have this hanging on the inside of my front door.  Now I hear a pretty jingly sound when someone opens the door and there's no more sneaking up on me. :) 

Challenges: 
Simon Says Stamp - Anything Goes.

Stamps:  To Santa From Buffy by The Pixie Cottage.
Paper:  Neenah Solar White
Ink:  Memento, Copics.
Accessories:  Liquid Pearls and Stickles, jingle bells, wire, cording, thin metal sheet.

Wednesday, November 23, 2011

Pixie Cottage Challenge #97

Happy Wednesday all!  Time for another challenge at  The Pixie Cottage challenge blog.  This week's theme is Make a Set.  That could be something like a card and matching box, a set of tags or set of cards.  There is also the sketch to follow, so you could choose to do the sketch as well. 
My daughter is getting married in March, and I made this set of tags for each of the five bridesmaid's gifts.  I know, I'm way early with these, but there is a LOT still to be done.  I used the Faith Sentiments stamp available at Michelle's Scrapbooking, cut and embossed with Spellbinders Scalloped Rectangle, and inked with Distress Ink.  The tag was cut with my Cricut, using some metallic cardstock from Hobby Lobby.  I made all the flowers (I'm getting better and quicker at making them) , except for the white one at the upper right.  The leaves are from Marianne D dies.  Added scraps of lace, some pearls, and crinkled seam binding. 

Hope you join us this week for a fun challenge! 

Stamps:  Faith Sentiments by The Pixie Cottage.
Paper:  Metallic paper from DCWV, Neenah  Solar White.
Ink:  Memento, Distress Ink.
Accessories:  Cricut, seam binding, flat-back pearls, Marianne D die, Spellbinders die, lace, handmade flowers.


Challenges:
Craft Your Days Away - Embellisment bingo (pearls, flowers, ribbons).
Gingerloft - Lace, fabric or felt.
One Stitch at a Time - Anything goes.
Simon Says Stamp - Tag, You're It!
Cooking With Cricut - Bible verse or quote

Wednesday, November 16, 2011

Pixie Cottage Challenge #96

Whew...where are the days going?  I can't believe next week is Thanksgiving!  Over at the Pixie Cottage Challenge blog the theme this week is Family Thankfulness.  There is also a great sketch to follow...so follow the theme, follow the sketch, or do both.  But come play along with our challenge this week!

I need more Christmas cards, so I followed the sketch and used Sebastian the Snowman, available at Michelle's Scrapbooking.  He is colored with Copics and has Stickles Frosted Lace on his feet.  The corner embellies are Spellbinders Holly Motifs and the snowflakes are a Cuttlebug die.  Gold Dew Drops for a final touch.  Easy peasy. 

Stamps:  Sebastian the Snowman from The Pixie Cottage.
Paper: 
Ink:  Copics.
Accessories:  Spellbinders Holly Motifs, Cuttlebug snowflakes, Dew Drops, Stickles.


This week's sketch

Wednesday, November 9, 2011

Pixie Cottage Challenge #95

This week at The Pixie Cottage challenge blog, the theme is Blue For a Boy.  There's also a great sketch to follow, as always.   I just go this new Pixie Cottage image by Alisa Ramirez called Not Even a Mouse, available here at Michelle's Scrapbooking.  How CUTE is that little bear with the mice sleeping all over him!!  I decided to follow the sketch this time, flipped it on its side.

I colored the image with Copics and added Liquid Pearls to the fluffy parts of the hats.  Cut and embossed the image with Spellbinders Labels Fourteen, edged it with a gold leaf pen.  The little poinsettia and frilly diecut in the back are Spellbinders Holly Accents and Motifs.  Used Cheery Lynn French Doily die on the green damask paper.  Traced around the die and cut free hand for the matt, sponged the edges of both.  All DP is The Paper Studio.  Added the Dew Drops.

Stamps:  Not Even a Mouse from The Pixie Cottage.
Paper:  The Paper Studio.
Ink:  Copics, Distress Inks.
Accessories:  Dew Drops, gold lead pen, Spellbinders Labels Fourteen, Holly Accents and Motifs, Liquid Pearls.
This week's sketch

Wednesday, November 2, 2011

Jester Favor Box

Over the past several weeks I have been making flowers, punching different leaves, and cutting box bases from scraps of cardstock and DP in my stash.  Even a lunch bag didn't stand a chance and got punched out for a couple different flowers.  I spent several weeks before all the cutting and punching, planning 22 different little favor boxes, all for my daughter's wedding.  She knows I love paper crafting and I love boxes and she asked if I could make a different favor box for each table.  So I now have one each of 22 different boxes completely finished, and 7 more of each cut out and the flower parts and leaves and embellishments cut out and ready to assemble.  I'll eventually get them all posted.

So anyway, as I was surfing through different challenges I came across the fancy folds challenge at Our Creative Corner and use your scraps challenge at  Mark's Finest Papers.  This is the box that fits both as it is a fancy fold and is made entirely from scraps in my stash. I call it Jester (yes, I'm a dork...I named each box).  I went to a Montessori school for 9 years, entering public school at age 11.  I have kept in touch with the teacher I had during those Montessori years, and when I graduated from high school she gave me a book on origami boxes and this box is one of them. 


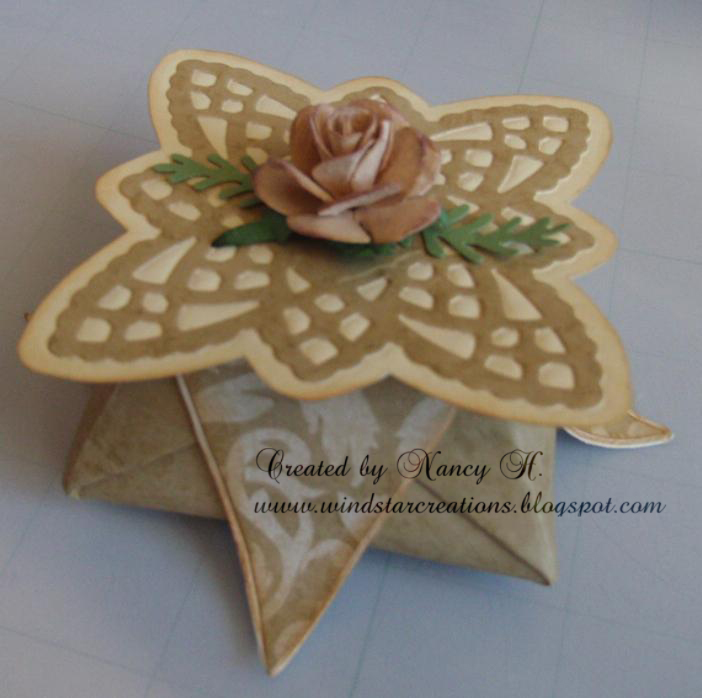
The base is a 6 1/2" square scrap I had in my stash, have no idea who the maker is but I got it at Hobby Lobby.  Various folds got it to the box form, with little "flaps" on each side. It came out to 2 1/2" square. The flourished paper I also got at HL, and thankfully have enough scraps for all eight boxes.


Here's a view from the top.   For the base of the lid I traced around the outside of one of the Spellbinders Lacy Doily Accents dies, cut it out by hand, and then embossed it with the same die.  I did a die cut from the same die using the another scrap same as the base and glued it onto the base, so it has an inlaid look into the embossed based.  I have seen different tutorials for Prima-like flowers around blog land, using the Retro Flower punch.  I don't have that punch, so I searched my Cricut cartridges and cut the layers of the flower  and the star base on my Cricut and made the flower.  It's tan cardstock with a sponge bath of Milled Lavender Distress Ink.  The fern leaves are a punch. 
Just another shot with the lid askew so you can see the inside. 

Underside of the top, with it's little lid that fits right inside the box.
Our Creative Corner - Fancy Folds
Mark's Finest Papers - Use your scraps

Stamps:  None.
Paper:  Stash scraps, from Hobby Lobby (not sure of maker).
Ink: Distress Inks.
Accessories:  Spellbinders Lacy Doily Accents, Cricut, fern punch.

A Pixie Cottage Christmas Card

Time to start adding more Christmas cards to you stash, and this week's theme at The Pixie Cottage is Christmas card.  There is also a wonderful sketch to follow.  So create a card using the theme or the sketch, or both, but come join us for this week's challenge! 

There are lots of wonderful Pixie Cottage stamps available at Michelle's Scrapbooking.  For the Christmas card theme, I used the Winter Window image by Sandra Hammer.  I colored it with Copics, sponged lightly around the edge with Aged Mahogany Distress Ink, and added some Stickles to the snow and tree.  I stamped and cut out an additional tree, colored the same at the first one, and mounted it on foam dots.  I followed the sketch and used DP from The Paper Studio. Sentiment was printed from my computer, cut/embossed with Spellbinders Double-Ended Tag and added the acrylic snowflakes. 

Stamp:  "Winter Window" from The Pixie Cottage.
Paper:  The Paper Studio  DP and  CS.
Ink:  Copics, Distress Ink.
Accessories:  Stickles, foam dots, acrylic snowflakes.


Challenges
One Stitch at a Time:  Christmas
Papertake Weekly: Anything goes
ABC Christmas Challenge: V for vintage.