Tuesday, September 30, 2008

Life is Good With Kitties

I have a couple sets of these adorable kitties and decided to give this challenge a whirl. I used pale lavender card base and covered it with DCWV Far East Mat Stack. Then cut away the right edge and attached shimmery gold vellum then the scallop. The "ribbon" is the same little bit darker lavender paper as I used for the scallop. For the flowers, cut them out with my Cuttlebug in dark purple and pale lavender, then did the switcheroo like I did a few posts ago. Added Tiara Stickles to the centers and attached them. For the main image, I colored my oriental kitty with Prismacolor pencils, chalked around her, and cut her out with round Nestability. The scallop was cut from a shimmery olive green vellum. I added a layer of Frosted Lace Stickles over the lavender colored fan, also Lavender Stickles to the centers of the flowers and the ends in her hair decoration. The sentiment was from the Verve's Artful Elegance set.

Stamps: Pink Cat Studio, Verve.
Paper: Paper Studio CS, DCWV Mat Stack, vellum.
Ink: Colorbox Queues.
Accessories: Prismacolor pencils, Cuttlebug, Stickles, border punch, Nestabilities.

Monday, September 29, 2008

Hangin' With Count Catula!

I've had this Magenta stamp called Count Catula since last year and decided to use it when I saw this sketch.
I put a piece of paper that looked like gray flannel through with my Cuttlebug Spiderweb folder, attached that to the base card. The spiderweb on the strip was embossed with silver powder...just hanging out there in the corner. Catula was colored with Prismacolor pencils, edged in chalks, and cut out with a square Nestability. This was then mounted on another square and attached to the base. The sentiment was done with the Justrite Monogram stamper Special Fonts set and small letters, with no border. Cut it out with a Nestie circle, inked the edges and attached it with dimensionals. I know they're not your usual halloween colors, but I think they look pretty nice. :)

Stamps: Magenta, Justrite.
Paper: Paper Studio.
Ink: Top Boss embossing, Colorbox.
Accessories: Justrite Monogram Stamper, Prismacolor pencils, Cuttlebug, embossing powder, Nestabilities, dimensionals.

Sunday, September 28, 2008

Whiff of Joy Challenge #1

After I made my first WOJ card yesterday, I found the Whiff of Joy blog with their first challenge, so had to make another card to go play that - darn it! :) It was a fun sketch to follow.
The paisley background DP kind of swallows the base circle, but if you look closely you can see it and IRL it shows up really well. It was a doily (that word looks funny) I had sitting on my table from ??. I sliced it up and folded into a smaller circle, inked it with Velvet Colorbox and then tapped on it with Distress Ink and smeared that with a Q-tip to soften the edges. Colored the main image with Prisma pencils and chalked around her (they shimmer nicely in the light). Added Stickles to the flowers on her pants and bookmark, and Liquid Pearls to her wings. Cut her out with a circle Nestabilities and then a scalloped mat and popped her up on dimensionals. Stamped a ribbon from Prima onto the vertical strip and added some Dew Drops to the other. Attached it all to the burgundy card base. Sentiment is from a set called "Will -n- Way", rounded and inked the corners and attached with dimensionals. I love square cards. : )

Stamps: Whiff of Joy Melinda Reading Book, Will -n- Way sentiment, Prima Mktg.
Paper: Paper Studio CS, My Minds Eye DP.
Ink: Colorbox Queues, Distress Ink.
Accessories: Nestabilities, Prismacolors, doily, chalks, Dew Drops, Stickles, Liquid Pearls.

Saturday, September 27, 2008

Fell in Love...with Whiff of Joy...

I absolutely fell in love with Whiff of Joy stamps the first time I saw them, especially Melinda and Willow. I finally jumped in and got some.
This is my first card I did last night using Willow with Hot Chocolate. I colored Willow with my new Prisma pencils I got on Evilbay for so much less than anywhere else I found in stores or online. Her blue "aura" was done with chalks. Cut the main image and mat out with Nestibilities, embossed the main image, inked the edges a bit, and matted it on the brown. The base card is Paper Studio CS from Hobby Lobby. The two DP layers are from Hot off the Press; cut the circular one with my Coluzzle. I put the ribbon on (Michael's $1 bin), then attached Willow with dimensionals. Put the Dew Drops on the circle, then stamped the sentiment from the SU! Garden Collage set. Set it up and looked at it and it just seemed off balance. I was tired so went to bed, then this morning I started going through my Cuttlebug dies and thought these flowers would be perfect. Picked out three colored papers to go with the rest of the card, cut them with the CB and then swapped the different parts of the flowers and put them back together. Attached all with dimensionals and then put Tiara Stickles in their centers. That was it...balance. I love it!
Stamps: Whiff of Joy, Stampin Up!
Paper: Paper Studio CS, Hot Off the Press.
Ink: Colorbox Queues.
Accessories: Dew Drops, Cuttlebug, Stickles, Nestabilities, ribbon, dimensionals, Coluzzle, Pebbles Inc chalks.

Friday, September 26, 2008

Time 2BKrafty!

Sharon's Stamp Simply Challenge this week showcases one of my favorite bloggers to stalk...Janine! This is the card I chose to case so that I could use my Cricut.
I embossed with the Cuttlebug spiderweb folder and then inked the raised parts. Tried to keep it only on the web, but you know...ink happens. :) Yellow layer under the black strip is a piece of tissue paper I wadded up tight then ironed back out. The pumpkins I cut with my Cricut, added Stickles to the leaves and "crazy eyes" and mounted on the black strip; the center pumpkin is popped up on dimensionals. Finally, added the tag from Spellbinders with the word printed from my computer, and some Dew Drops. My ribboning skills need work. :)
Stamps: None.
Paper: Paper Studio CS, tissue paper.
Ink: Colorbox, computer.
Accessories: Cuttlebug, Cricut, Stickles, Spellbinders, ribbon, Dew Drops, computer.

Monday, September 22, 2008

A Card for a Cause

There are several blogs I drop in on everyday for inspiration and to enjoy the eye candy. Carolyn King's is one of those, and she is giving away an absolute huge bushel of blog candy to bring focus on Alzheimer's disease in honor of her grandmother who recently died from this disease. This is also to give kudos to those who are caregivers of those suffering from the disease. My grandmother passed away years ago from cancer, but she also suffered from dementia near the end, so I know the toll this disease can take on anyone involved.
I made this card for a good friend of mine who is taking care of her mother who was recently diagnosed with Alzheimer's. It has been heartbreaking for her. We try to get together for dinner once a month, but talk on a phone quite a bit. Tommie is a teacher and with school starting again she was so worried about what to do with her mother, but thankfully she found a wonderful adult daycare center that specializes in Alzheimer patients, and her mom really enjoys going each day. In fact, she came home one day and said she needed a costume but didn't want one like all the others. I will be meeting Tommie for dinner on Wednesday and will give her this card.

Stamps: Rebecca - Repeat Impressions; Garden Grass - Rubbernecker, Kitchensink Sentiment.
Paper: Paper Studio CS.
Ink: Colorbox, Stampabilities Dye Ink.
Accessories: Brayer, watercolor pencils, Marvy markers.

Saturday, September 20, 2008

I Got INTO This Box!!!!

Oh, did I love this!! This Out of the Box kit from Lauren arrived yesterday. I felt like a little kid getting some candy! :) I read the instructions, whipped out my Scor-Pal and had the box together in no time. Her instructions are poifect! There is no end to this lady's talent and imagination!!

This is the box made with the items that came in the kit. I gave this set to a friend. I coated the black flower on the belly band with some black Stickles then when that dried I dotted Red and Tiara Stickles in the center. It looks really pretty IRL. I also put a silver Dew Drop in the center of each button on the handle. For the cards, I embossed the base with Cuttlebug Stylized Flowers folder. Stamped Inkadinkado's Floral Flourish on the white panel and dotted the center of each flower with red Stickles. Used that wonderful JustRite monogram stamper, cut out the circles with my Nestabilities, then mounted it all up on the background and tied on the ribbon. So classy! Yes, that is my dashboard they are sitting on. I was taking this to my friend's house when I realized I forgot to take a picture. Still had the camera in my console from Friday night when my son did the Color Guard for the football game, so I pulled over and set these up on the dash and ~*click*~. Please ignore the dirty windshield. : )

My daughter left for college a month ago ( I miss you Baby Girl! ) and even though she keeps in touch with family and friends via e-mail (almost daily to her momma), she said it is fun to get snail mail. I knew she would just love this set so I made this for her. I also made a set for her roommate, whose favorite color is orange. I made the monograms with the JustRite Stamper again, putting the small letters around the border. I cut out and embossed the circles and the ovals with Nestabilities. The lower edge of each of the decorative strips was cut with different border punches. The belly band decoration is cut from a Cuttlebug die, with flat-back pearls on each side.
Here is the box open, so you can see the cards and envelopes in each of the pockets. I made 8 cards for each of these sets, but could have easily fit a couple more because they were relatively flat without the layers.
Here's the orange set I made for my daughter's roommate. The flower and butterfly on the belly band were cut from a remant of the main paper. The butterfly has lots of glitter embedded in the embossing and is very shimmery. I tried not to make these sets too frilly and fussy, as both girls are ROTC scholarship recipients, going to Norwich University in Vermont. BUT...they are still girls, so there's some frill. : ) I left the handle off both of these for simplicity of shipping them.

Stamps: JustRite Monogram Stamper, Inkadinkado. Paper: Graphic45, Cloud 9. Ink: Colorbox. Accessories: Nestabilities, Cuttlebug, Scor-pal, pearls, Basic Grey magnetic closures, Stickles.

Thursday, September 18, 2008

Happy Birthday to My Brother!!


Here are a couple of cards I made for my brother. I made
them both and left the inside blank so my mom could pick one to give him and then the other would be from me.

This first one I pretty much completely cased from Jerri. I found it a while back in her gallery. Stamped and cut apart the lighthouse image, sponged the edges and attached to same color as base paper. Stamped the sentiment from Lexicon of Love, sponged and mounted on same base color. The background is French Flair; like that windswept look, but made sure not to ink up the birds so they wouldn't come out on here. Sponged the edges, and then attached everything to the base card, added the brads and some raffia.

Stamps: SU! Lighthouse and Lexicon of Love, French Flair
Paper: Paper Studio CS.
Ink: Color Box.
Accessories: Raffia, brads.


Here is the other card. I also cased this one, but can't remember who (sorry). My little brain couldn't seem to come up with anything masculine on its own. : ) This is simply background cardstock stamped with a journaling image I got at Target. Then a layer with three strips of torn paper edged with gold Deco marker and then the whole square edged too. Attached the eyelets and strung thin gold cording along one side. Celebrate was stamped and embossed in gold on a strip of blue CS, then the strip edged with the Deco marker and attached to the background. Added the curly hardware and voila`.

Stamps: Unknown set from Target, SU Wonderful Words.
Paper: Paper Studio CS, My Minds Eye DP.
Ink: Color Box.
Accessories: Eyelets, cording, embossing powder, Deco marker, hardware

Tuesday, September 16, 2008

Dolly Mama Halloween

Here's a cute card I cased for halloween last year. I even had the same stamp. Instead of inking
"Is it Hot in Here" which was on her bag, I wrote the word "Hexes" on it. Colored her with water color pencils, added those cute little bat brads and matted her on orange CS. The sentiment was printed off my computer and mounted, then all put onto the base card after attaching the ribbon. On the inside I printed out "hocus pocus" in a pumpkin font, and in the lower right corner stamped and embossed a black cat, and on the inside left stamped and embossed a silver spider and web.
I don't have a picture of the inside, but I kept one of the cards so when I find it I'll take a snap of the inside and post it.

Stamps: Dolly Mama Is it Hot in Here, Inkadinkado Scaredy Cat and Spider and Web. Paper: Paper Studio CS.
Ink: Colorbox.
Accessories: Brads, ribbon, computer, embossing powder.

Sunday, September 14, 2008

My first Challenge - SSnotime52

I love looking at Sharon Johnson's blog every morning and have been trying to get brave enough to attempt a challenge. I thought this Stamp Simply Challenge would be a good one to jump into for my first try. We are to Cuddle Up With Tammy (Tammy Hershberger ) to create a warm and cozy card. I got to bring my sewing machine forward on my table for this one. I hope this card will do.

All my paper is from Hobby Lobby. The ribbon was a spool in the $1 bin at Michaels. The cute little buttons are from Michael's too. They came in a package in the most gorgeous muted colors! I attached the ribbon, stitched a wavy straight stitch all the way around the card and over the ribbon, then attached the buttons. The teacup is by Inkadinkado, stamped in Burnt Copper Colorbox, then cut out with an oval Nestie and then a scalloped one. While the oval was still in the die, I attempted to create somewhat of a vignette effect with the Ruby Satin and Gold Brocade.

Stamps: Inkadinkado Vintage Teacup.
Paper: Paper Studio CS, My Minds Eye DP.
Ink: Colorbox Burnt Copper, Ruby Satin, Gold Brocade.
Accessories: Nestabilities, ribbon, buttons, sewing machine.

Thursday, September 11, 2008

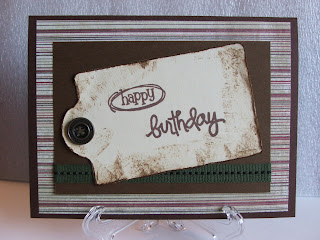
Masculine Birthday

Here's a straight forward, no frills birthday card I made for my son's best friend. Sometimes it is hard to make a masculine card without adding more frills and fuss.

For this one I attached the striped DP then the same brown cardstock as the base after attaching some ribbon (Hobby Lobby - I get several spools at a time when they have their 50% off sale . . . nothing better than 5 yds for 98 cents!). On top of this I put a tag I cut out with my Coluzzle template from a manila folder. I inked the edge with Distress Ink and patted the ink pad around on the tag. Then I used my handy dandy metal ruler again to distress the edge of the tag. I sew a lot and have a bin of extra buttons in my sewing closet. I dug around in there and found this button and stuck it on. I don't know what stamp set this is. I got several little sets at Target for $1 each a couple months back. I like the way this one turned out. : )

Stamps: Unsure.
Paper: Paper Studio CS, My Minds Eye DP from Hobby Lobby, manila folder.
Ink: Colorbox Queue, Distress Ink
Accessories: Button, ribbon, Coluzzle

Tuesday, September 9, 2008

Some More Firsts, Technique Wise...

...where do I begin?? : ) My kids gave me this adorable stamp for Christmas, because they know I love fairies and all things whimsical. I saw a card with this image and cased it somewhat. I colored my fairy with watercolor pencils, used an aqua pen to shmear the color a bit (very little bit). There's one first attempt, so didn't make much of an effort on this image so I wouldn't mess it up. I colored her wings pale yellow and then put a layer of Fire & Ice Twinkling H2O over the yellow, followed by Indian Copper highlights, with Garnet used on the flowers around her waist. Another firstie...those Twinkling H2O's. I thought they would have more shimmer, but the card has to be turned just so to pick up the shimmer. They are pretty though. I added some yellow Stickles to the center of the flowers, and also Fruit Punch Stickles to the wings. I have had my Flower Soft stuff for a couple weeks but decided to dive into that with the flowers on this image; I used the Lavender. Had a hard time getting some of it to stick so maybe I had it on too thick. So that's new stuff #3. I have used my Cuttlebug many many times but just got the Frills border embossing folders in the mail yesterday and decided to break one in on the strip behind the main image. Oh my, are those fun! Let's see, last firstie would be the sorry attempt at distressing the edge of the green cardstock. I don't know how that is done to make it look "real", but I just used the edge of a metal ruler and rubbed it back and forth until I thought it didn't look so bad anymore. : )

Stamps: Flower Fairies from Stamps Happen.
Paper: Paper Studio CS, My Minds Eye DP.
Ink: Black Color Box., watercolor pencils.
Accessories: Cuttlebug, Twinkling H2O's, Flower Soft, Stickles, aqua pen.

Tuesday, September 2, 2008

For My Sweetie

Back in May my boyfriend and I celebrated one year together. We have taken lots of pictures of the things we have done together, with our kids, friends, etc., over past year. I thought that rather than give him a card, I would make this album.
This is a We R Memory Keepers Raw Goods album, 5x7 size. It a 2-ring binder and comes with 10 clear pages.
I covered the album with My Minds Eye DP from Hobby Lobby (of course ~grin~). I put narrow cording on the edges that move when it is opened, to conceal the raw edges there. I stamped Inkadinkado's Wine & Cheese stamp on ivory cardstock, cut the edge with decorative scissors then inked the edges. Attached it to the pink CS with dimensionals to pop it up, and attached that stack to the album. The heart I cut from a card that was given to me in another life and ended up in my scrap box. It even already had gold foil embossed ribbon on it...how convenient is that? : ) That gorgeous metal plate was put in as an extra with something I bought on E-bay. There are three different plates in this set and I just love them. I chose this ivory one because it went so well with the paper. The sentiment I put together from alphabet rub-ons from K&Company, with each individual letter rubbed on separately to form the words. I thought the sentiment and the stamp went really well with the whole theme of the book.
I included a shot of a couple of the pages. Some are more decorated, and each page has two or three pictures. These shots were of NIOSA (Night in Old San Antonio), which is part of our annual Fiesta celebration (somewhat like a Mexican Mardi Gras). It is a blast!! Also interspersed between the photo pages, I printed out the words to three different love songs that remind me of US. I printed them on DP that had a small faint image, then cut the edges with decorative scissors, inked the edge, and attached it to a 5x7 piece that I cut from manila folders and punched holes. I like the folder's thickness...not too thick but still sturdy. Each page was decorated completely different. I used different stamps, bling, stickers, chipboard, glitter, rub-ons, caligraphy...you get the idea. My boyfriend loved it! : )

Stamps: Lots of different ones.
Paper: Paper Studio CS and My Minds Eye DP from HL.
Ink: Colorbox Queues.
Accessories: We R Memory Keepers, bookplate, cording, bling, rub-ons, and a variety of other embellishments throughout the album.