We want to wish everyone out there a very Merry Christmas, and safe travels if you're on the road. Love and enjoy your family and your time together! I leave you with the latest snap of my beautiful kiddos, Tyler-17 and Shelbie-20.


 I saw Sharon's challenge earlier in the week, to use pleated ribbon on our card. I am so ribbon challenged I just kept putting it off. I had everything worked out for the card, decided to use this week's Mojo Monday sketch for this card, but could not get the ribbon to look presentable. Then I remembered this ribbon I bought probably 15 years ago that I used on a dress for my daughter, and decided to use it. Thankfully the color was right so I didn't have to change what I had already started on the card.

 So here's my take on that. I decided to use this card for this week's Our Creative Corner
  We spent two nights and a day with Barb and Jerry before continuing on to Vermont. During our day there, we did the zip-line from the 230-foot tower at Shepherd of the Hills. It is about half-mile long, takes almost a minute to get to the bottom. It was wonderful! From left to right in the picture is Barb, me, a charming young man who got stuck with us three ladies, and Shelbie. Jerry took this picture from the top of the tower. Such fun! We spent the rest of the day wandering around Branson, with Barb and Jerry showing us different sights and attractions. I felt a wonderful kinship with Barb, and I hope we get to see her and Jerry again soon!
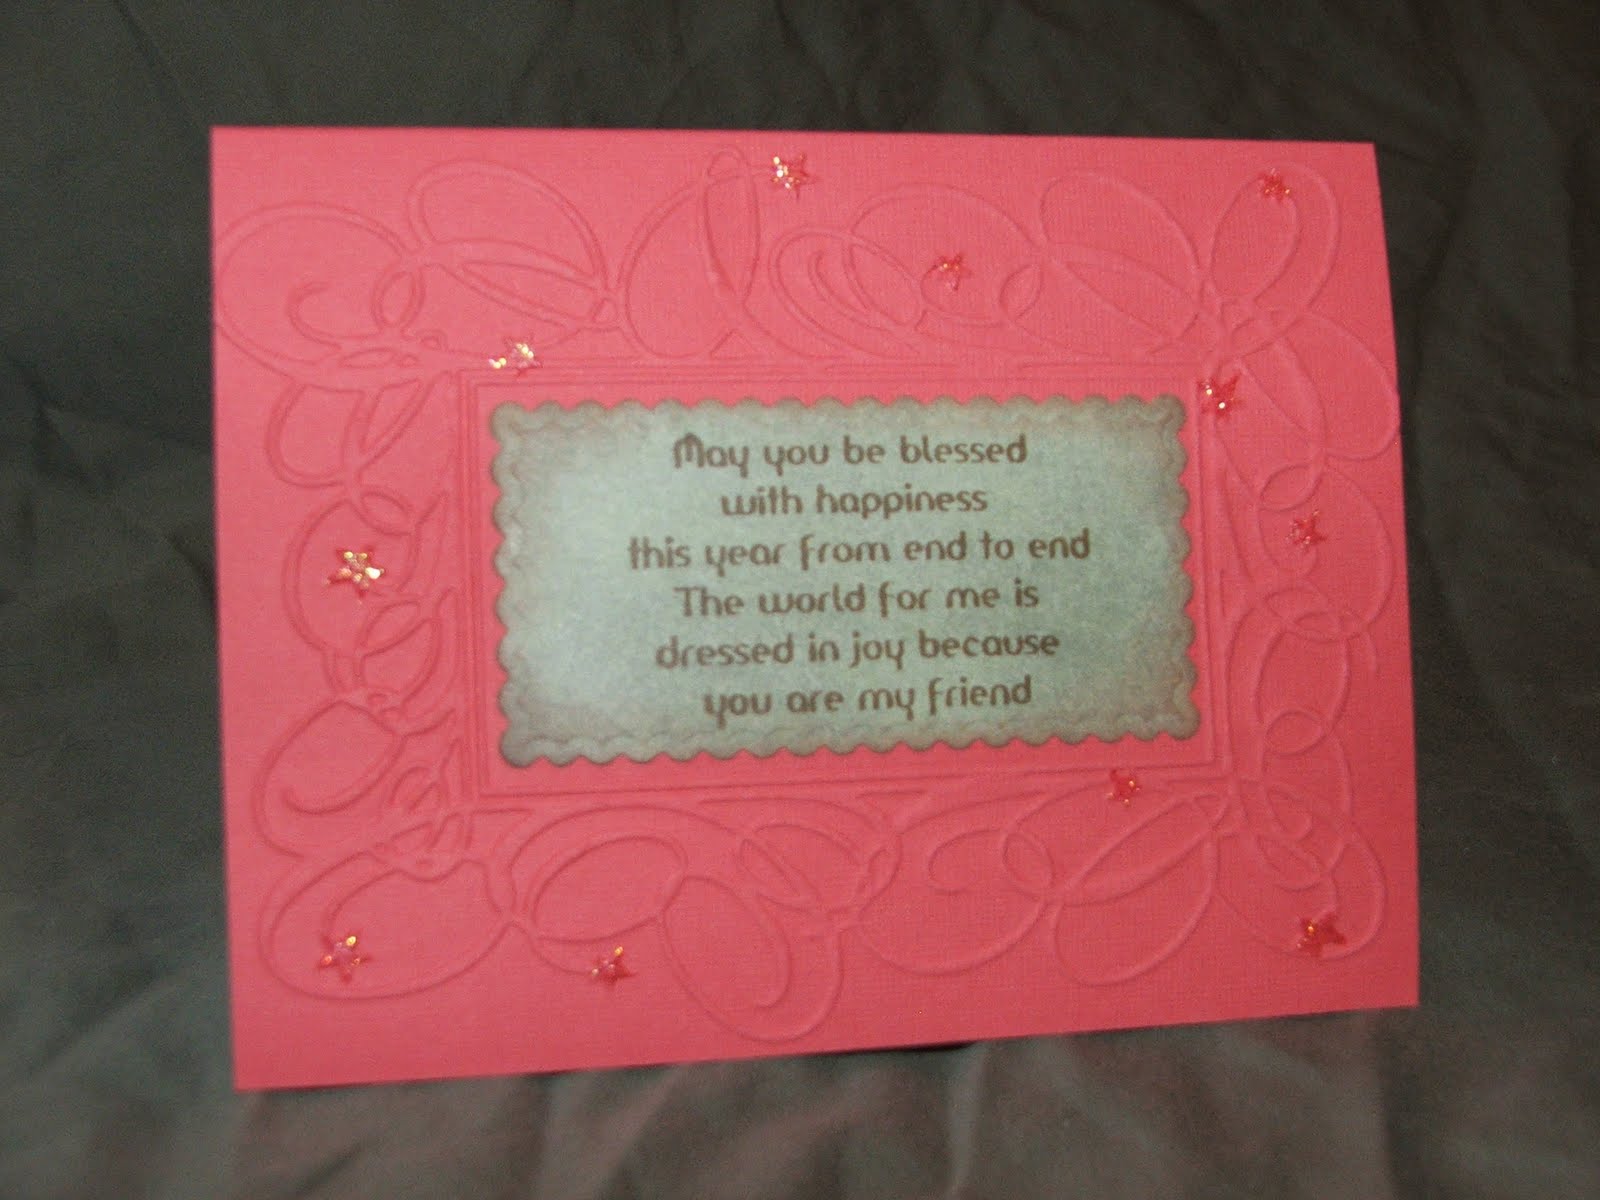
 This card followed the Mojo Monday 146 sketch. I used a Tim Holtz embossing folder for the base and the vellum oval, slathered them with distress ink. The strips are from a DCWV pack, inked those edges as well. Sentiment is from Inkadinkado, stamped with distress ink, cut out/embossed with Wavy Squares Spellbinders dies.

 Today is my son Tyler's 17th birthday. Where did the time go? He is such a wonderful young man, and I love every minute I have with him! Crazy that three weeks ago today I got a phone call all parents dread. Tyler was involved in a serious auto accident in which the van he was riding in was struck from behind while they were stopped at a red light. Four vehicles involved, with the van being sandwiched between the car in front of them and the one behind them, which was hit by a commercial delivery truck. There was a fatality in the first vehicle hit, Tyler suffered a head laceration and concussion, Tyler's stepmother was in ICU for four days with serious injuries, and one of his friends was also injured in the accident. Everyone is home now and on the road to recovery. I still slip into Tyler's room at night to check on him. Everything can change in a flash.
 I used the new Spring Bouquet stamp set from Flourishes, which I really like. Love this gorgeous bouquet. I stamped it with Stazon and colored with Primacolor Pencils blended with baby oil, then chalked around the image. Traced around the inside of the 2nd largest Labels 10 Nesties and cut out the image by hand so I could have the flowers extending beyond the margins, then cut a mat from the largest die. Stamped around the edge of the mat using Perfect Medium on a Crafty Secrets Flourish stamp, then applied Perfect Pearls. Gave it a pretty Ole-timey frame look, I think. : )
 d Stickles. A few flat-backed pearls on the front and...voila'. A pretty Mom's day card!
 We will head out Saturday after the graduation ceremony, so we can see one of her friends she went to high school with graduate from Norwich. We are going to do a week-long road trip coming back so we can do some sight seeing along the way. I have some friends in York, PA and Apex, North Carolina, so plan to make stops there to visit with them while we're on our way back. We both are really looking forward to the trip!

 und her while still in the die, then inked the edges. Mounted that to brown CS cut on the fold with the largest Labels 8, and attached a smaller label to the inside to write on. All DP is Basic Grey LilyKate. Flowers cut and embossed w
 ith Nellie Snellen punches, sprayed with Glimmer Mist, and added some Dew Drops. Attached a little pocket inside to put the card in. Will also be including a one-hour maternity massage for Audrey.

 acker board from a pad of decorative paper. This gave the box good stability, and also added perfect weight to give a good "flop" effect when the lid is taken off. I made and attached the stand for the card, then stamped and embossed the corners of a square piece of CS with a CS Flourish. Cut the square on the diagonal and attached it over the card holder. All the flowers and leaves were made from various punches, painted with Twinkling H2O's or sprayed with Glimmer Mist, and attached in various places with Stickles. One was attached to each panel. Four others were attached to acetate strips, with the other end being threaded through the flourished panels before it was attached. When the box opens, the panels flop down and the flowers on the acetate strips spring outward and sway. Again see Elaine's blog for more of those.
Okay, here's the "Jose moment": About five years ago I was in the grocery store checkout line with my daughter and six of her friends, getting supplies for a party at our house. All of these kids were in ROTC together, and all called me Mommy (still do). As I was about to pay for our goodies, one of the boys, Paul, was trying to get my attention and started bobbing up and down and saying "Mommy, Mommy, Mommy" over and over. The others quickly followed suit, and soon there were seven teenagers bobbing up and down and repeating "Mommy....". Not loud or disturbing anyone. The cashier looked at them - and me - with a strange expression. I told them to shush and they all piped down right away. Jose happened to be standing right next to me. He flashed his brilliant smile at the cashier, and in his very thick Chilean accent said "we all have different daddies". Ay yay yay. I just shook my head, and then we all started giggling. Still not sure to this day that the cashier didn't think they were all mine, all from different daddies. : )
 This is the other post that was supposed to go up over the weekend. Let's see if I got that scheduled post thing right this time. : )
 at the Austin Rodeo. Before it started we were wandering around the vendor booths, bought some silly hats (and I will wear mine when we go tubing this summer!) and some pretty rings. We came to one booth that had some beautiful plaques done in sort of shabby chic. Shelbie looked at one she liked, but when she saw the price she was shocked. So was I! The lady was selling these plaques for $40-60. I told Shelbie I would make her one, and this is what I came up with. It was fun to play with different stuff. I think she'll like it. The picture on the left is a bit washed out from the flash, but you see the overall shot. The smaller one below is more true to color.
 glued on various sized paper roses, punched some leaves and added veins with an embossing tool. Added Stickles to the tiny rosebuds before attaching those, then added the butterfly brad after I attacked it with copper Stickles on the wings. The sentiment I printed from my computer, onto plain copy paper that I "aged" by dunking into some water to which I had added a couple drops of Tea Dye Reinker. I tore the edges while it was still wet and then inked them. After it was dry I sprayed it with two different colors of Glimmer Mist. You can see the sheen if you click on the image. I glued on the Spellbinders Doodleparts flourish, added some flat-backed pearls. Used three dif
 ferent ribbons in different colors, one organza and two satins for the hanger, and threaded faceted beads onto the thinnest ribbon. I attached an eye-ring to the bottom center of the plaque and to that attached the filagree medallion. Another eye-ring, some tiny beads and more faceted beads, then an angel charm at the end, and that dangles from the bottom. Sorry so dark. I'm using a different camera and haven't made friends with it yet.
 p on it! Jan sent me this gorgeous gold sheen diecut and I went to town. All of the gold pieces shown are part of the diecut kits. These diecuts can be decorated on both sides and closed to mail or hand deliver. But I did mine as a diorama, so it will remain open, and the backside is not decorated. The Crafty Secrets "Love" image on the left panel was embossed with gold EP onto ivory vellum then attached over a piece of CS from DCWV Luxury stack. The frame around it and behind it were stamped with Crafty Secrets Flourishes using Distress Ink. Ditto for the right panel. The center image from this site was printed from my computer, then image was cut/embossed with Spellbinders Labels 10 and attached on foam tape. The sentiments were printed from my computer, cut/embossed with Spellbinders Labels 10 and Fancy Tags dies, then sponged. Both were attached on foam tape. Embellishments on left panel: Prima roses misted with Glimmer Mist, punched leaves, Spellbinders Renaissance Heart charm with Stickles. Center panel: More Prima roses, punched leaves, Spellbinders Doodleparts swirl with rhinestone, cameo charm, Liquid Pearls on scallop. Right panel: Yep, another Prima rose, punched leaves, and flat back pearls.

Here’s a list of what is included with the blog candy:
Cuttlebug Asian Bundle. Includes (4) 5 x 7 embossing folders, (4) 4.25 x 5.75 folders. These are gorgeous!
Basic Grey “Eskimo Kisses” 6 x 6 paper pad.
2 silver, 1 gold sheet of outline stickers (Anita’s Art Stamps)
1 sheet Spring theme vellum stickers (Sticker King)
1 sheet floral rub-on transfers (Royal & Langnickel)
1 sheet ‘High School Sayings” rub-ons (Me & My Big Ideas)
Cuttlebug ‘Invitation’ embossing folder (out of package, never used)
Blue label tin
Tiny glass bottle with cork
10 tags with cord
1 bottle Stickles Fruit Punch
1 sheet dimensional floral/frame stickers
Adhesive Metal Words (Colorbok)
Lattebella stamp from Stamping Bella (Mounted on EZ Mount, never used)
Paper Studio 1-7/16” circle punch.3 large and 6 small spools of ribbon, various makers.
Ultimate Crafter's Companion - This was given to me as a gift, but I have only used it once just to check it out. I already have The Enveloper from this same company, a Scor-Pal, and then was more recently given Martha Stewart's score board, so really don't need another item that does all the same things sitting around collecting dust, so I've decided to add it to this blog candy.
 talking about anythind and everything. Then I got a job last summer and our meetings spread out. Deborah finally was able to find a job a couple weeks ago. I made this card as a good luck/congrats card for her. Made it following Sharon's CAS/texture challenge, clean and simple with texture.
  time flowers and keeping it clean and simple (CAS). Don't know how successful the CAS was, but there are flowers! : )
 bining the two. Three times. haha. There are three cards, all pretty much the same but different color scheme.
 challenge states. : )
  aper. The latter didn't come out as well plus had some excess ink, but they still looked good. I colored them with re-inkers and a water brush, then sponged around her. I cut out the images and then a mat for each, clipped the corners. The base card is SU! kraft CS, and the card is 5.5" square. I stamped a Crafty Secrets flourish in coordinating color along the top of the base. All the DP is from DCWV Once Upon a Time mat stack. I used a different border punch on each. All the flowers are Prima flowers, except the big blue one. I made that one. The small roses on the green and maroon card were white, but I spritzed and dipped them in Glimmer Mist. Different leaf punches for each, and some quilled curly-ques. I added a tiny flower on the maroon card with Stickled center, to cover a blub I couldn't correct. Probably didn't need to say that. : ) Anywho...these are my cards for Sharon's two challenges.
  I initially considered a notebook, but then I ran into (again) all my empty Cricut cartridge boxes. I have...a lot. Couldn't part with them after I came up with a more space-saving means of storage. So I attacked this box with some pretty paper from My Mind's Eye. The paper on the inside is a scrap from my stash, but it coordinated nicely. Once I got the box covered, out came the Spellbinder dies. I used the Fleur de Lis Pendant for the centerpiece, layering it with foam tape. The Fleur de Lis Borderabilities was used for the corner pieces, and to cover the ends of the box, which can't be seen in the pix. I used the Cameo die for the frame and attached it on foam tape to the pendant. The cameo is from Melissa Frances. I painted with some Pearl Ex in two different colors to bring out the detail. On the front flap I attached two of the Decorative Photo Corners die cuts, as well as a segment cut from the Borderabilities to use as an "escutcheon". The tiny lock is hanging from a large jump
  ring that I wrapped around the ornament before attaching; Its tiny key is attached to a chain that I looped around the pendant. The little legs I found last year at the stamp store just down the block. They look great!
 sent to me by a blogging friend. I think they were by Stampin Up!, based on the envelope size I found on their site. Anyway, those fit perfectly into the box, so I gave them a dose of Spellbinders dies and made a note card set for myself. Used the Lg Deckled Mega Rectangles Nestabilities over the base, inked along the edges. Again used the Cameo die mounted on foam tape, decorated with Liquid Pearls and a couple flat-backed pearls. Symbology One ornament in the corner, and some flowers made with various sized punches, and an MS butterfly flying around. Used JustRite Special Occasion font for the monogram.
 prom pictures and decided these were the ones for the layout. The base DP is from Anna Griffin, I think (sorry). I used Classic Frames die to frame pictures. The roses were cut from the Rose Blossom Edgeabilities, stenciled while still in the dies, as was the frame. For the "journaling", that was actually my handwriting from the back of the picture on the left...from April 1980. I scanned the back of the picture then printed it onto some DP and cut that out with a Curved Rectangles die. If you click on the picture you can probably read what it says. I was such a dork! I actually made that dress, and it was so pretty - but lots & lots of satin! I used JustRite Brayton font to stamp "prom" on the ticket, which was cut from Spellbinders ticket die. The flourishes are from the Symbology One die.


 Oriental Theme card