Stamps: Crafty Secrets Fairyland.
Paper: SU! Sage Shadow, Crafty Secrets Earthy paper pack.
Ink: Versamark, Distress Ink.
Accessories: Cuttlebug folder, embossing powder, Stickles.


 acker board from a pad of decorative paper. This gave the box good stability, and also added perfect weight to give a good "flop" effect when the lid is taken off. I made and attached the stand for the card, then stamped and embossed the corners of a square piece of CS with a CS Flourish. Cut the square on the diagonal and attached it over the card holder. All the flowers and leaves were made from various punches, painted with Twinkling H2O's or sprayed with Glimmer Mist, and attached in various places with Stickles. One was attached to each panel. Four others were attached to acetate strips, with the other end being threaded through the flourished panels before it was attached. When the box opens, the panels flop down and the flowers on the acetate strips spring outward and sway. Again see Elaine's blog for more of those.
Okay, here's the "Jose moment": About five years ago I was in the grocery store checkout line with my daughter and six of her friends, getting supplies for a party at our house. All of these kids were in ROTC together, and all called me Mommy (still do). As I was about to pay for our goodies, one of the boys, Paul, was trying to get my attention and started bobbing up and down and saying "Mommy, Mommy, Mommy" over and over. The others quickly followed suit, and soon there were seven teenagers bobbing up and down and repeating "Mommy....". Not loud or disturbing anyone. The cashier looked at them - and me - with a strange expression. I told them to shush and they all piped down right away. Jose happened to be standing right next to me. He flashed his brilliant smile at the cashier, and in his very thick Chilean accent said "we all have different daddies". Ay yay yay. I just shook my head, and then we all started giggling. Still not sure to this day that the cashier didn't think they were all mine, all from different daddies. : )
 p on it! Jan sent me this gorgeous gold sheen diecut and I went to town. All of the gold pieces shown are part of the diecut kits. These diecuts can be decorated on both sides and closed to mail or hand deliver. But I did mine as a diorama, so it will remain open, and the backside is not decorated. The Crafty Secrets "Love" image on the left panel was embossed with gold EP onto ivory vellum then attached over a piece of CS from DCWV Luxury stack. The frame around it and behind it were stamped with Crafty Secrets Flourishes using Distress Ink. Ditto for the right panel. The center image from this site was printed from my computer, then image was cut/embossed with Spellbinders Labels 10 and attached on foam tape. The sentiments were printed from my computer, cut/embossed with Spellbinders Labels 10 and Fancy Tags dies, then sponged. Both were attached on foam tape. Embellishments on left panel: Prima roses misted with Glimmer Mist, punched leaves, Spellbinders Renaissance Heart charm with Stickles. Center panel: More Prima roses, punched leaves, Spellbinders Doodleparts swirl with rhinestone, cameo charm, Liquid Pearls on scallop. Right panel: Yep, another Prima rose, punched leaves, and flat back pearls.
 One more post for today; keep scrolling down for the other two. The Crafty Secrets Challenge on SCS is to make a monochromatic card. I wanted to use this image and sentiment, so searched around until I found this sketch (SFYTT) on Jen Del Muro's blog. I chalked around the image, cut it out with oval Nestabilities. Used Deco corner punch on the mat. Also stamped and cut out the sentiment. Used the DCWV DP because it was a perfect match for the chalking. The lower piece was plain, so I stamped a couple of the Crafty Secrets Flourishes, then attached the sentiment on foam tape. Added some Martha Stewart ribbon. There was a snag on the ribbon that I didn't notice until after I had it attached, so I made the vellum flower to cover it. :)
  First up is the card I did for the Whiff of Joy Challenge. This week was a sketch by Heather for us to follow. I colored the Willow With Flowers image with Prismacolors blended with baby oil, chalked around her and added Flower Soft. I think all the layers were my downfall with this one, I don't know. At any rate, all DP is by Hot Off The Press, including the shimmery BG. Made the flowers from scraps of the DP.
  o follow, to use ribbon or lace, brads or buttons, and paper piercing. Thought I would use the Mojo Monday sketch to finish up. Should have been pretty simple with all that, but after coloring the image from the Garden Girls set I couldn't seem to make it come together like I wanted. Bottom DP is from My Mind's Eye. Had a piece of wide lace that I attached to blue CS, and then the matted image over that. Did the paper piercing in the scallops around the image. The flowers were from a MS hydranga punch, attached with brads, then added Stickles to the brads. Corners seemed bare, so I added some swirlies in a couple different shades of blue.
  up on Papercraft Planet. The theme is springtime and I thought I would use my new Fairyland set. The base card is 6.75 x 3.25. I got a bunch of these with envelopes in some blog candy from Chris Mott; think they may be SU! Anyway, stamped this cute little image with Stazon, colored with (what else?) Prismacolor pencils blended with baby oil. Cut it out and embossed with a long rectangle Nestie. The little notes were from a differen tCS set. Chalked all around it, then added Stickles to the flowers by the fairy and on her dress and wings, and also a "fairy trail" behind her wings. Went all around the base CS with Fiskars lace borders punch, the cut DP from My Mind's Eye to go over it. Sentiment cut out with smallest scalloped rectangle Nestie, embossed, chalked and popped up on foam tape.
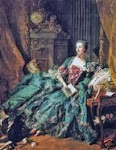
  Another post today. Might be a third, but haven't quite finished it up yet. This card I made for the Crafty Secrets Challenge on SCS. I got this new set couple weeks ago and it has such pretty images. This card was super simple. Card base is sage green. The pretty CS with the scroll is double-sided, called Front Room/Parlor. I don't like using double-sided papers for cards because I feel like I'm wasting that other gorgeous side, but I attached this to the base and tried not to think about it. Cut a piece of vellum the size of the card plus 1/2" so I could wrap that around to the back of the card and that's how I attached the vellum. Stamped this gorgeous image with Versamark and embossed with gold detail EP. The little cherub is actually a button, though I wouldn't want to attempt to button that one! hee hee. Snipped off the shank and attached it to the vellum. Bada bing...super easy card, but I really like how it turned out.
  I went for it. Clear embossed the snowflake circle from Verve, then embossed each letter in gold. Cut the circles out with Nestabilities. Green DP is Cosmo Cricket Wonderland, other gorgeous DP is from Sandy Lion. Stamped the sentiment in the lower right corner with gold EP. It barely shows up in this picture for some reason, blasted by the flash maybe, but IRL it looks great. It says "to the world". This was an easy peasy, put together in about 10 minutes kind of card.
 Don't have any phone images, so simply chose the Hello sentiment to go along with my four ladies, all from Crafty Secrets. Pretty simple one this time. I stamped the ladies on little squares cut and embossed with Nestabilities, inked the edges with silver and then ruby ink. Did the same inking on the sentiment tag, which is a Spellbinders ribbon tag. Ran the ribbon through it and put rhinestones on the ends. Also added a rhinestone to the center of the ladies, and then framed them with outline stickers. Cut the corners then inked the straight edges with silver.


 Oriental Theme card