Showing posts with label stamp. Show all posts

Friday, October 3, 2008

SSNOTIM55...Singing & Stamping With Becky!

Had one of those "whoa" moments this morning when I saw
Sharon's Stamp Simply challenge and just had to participate. This week Sharon is featuring design team member Becky. Becky makes amazing cards and projects using her stamps and amazing talents. She is also a singer with an amazing voice. I listened to her on myspace. :)
I did a different challenge yesterday (here) and had stamped this blue paper with this sheet music stamp by Purple Onion, and had also used Cuttlebug's Allegro folder on the same paper. I chose the embossed paper for the other challenge and this one went into my "now what do I do with it" drawer. Out it came this morning for this card! I inked the edges and mounted it on brown CS. I used this Inkadinkado stamp because it feels sing-songy. The sentiment is from Crafty Secrets Bird Notes set. Both were then cut out and embossed with Nestabilities. Inked their edges and lightly tamped the ink pad over each to try to tone down the white. Tied on that fun ribbon, attached the main image with dimensionals, and the sentiment directly on the base.
Stamps: Purple Onion, Inkadinkado, Crafty Secrets.
Paper: Paper Studio CS, Hot Off the Press DS.
Ink: Colorbox Queues.
Accessories: Ribbon, Nestabilities

Thursday, September 18, 2008

Happy Birthday to My Brother!!


Here are a couple of cards I made for my brother. I made
them both and left the inside blank so my mom could pick one to give him and then the other would be from me.

This first one I pretty much completely cased from Jerri. I found it a while back in her gallery. Stamped and cut apart the lighthouse image, sponged the edges and attached to same color as base paper. Stamped the sentiment from Lexicon of Love, sponged and mounted on same base color. The background is French Flair; like that windswept look, but made sure not to ink up the birds so they wouldn't come out on here. Sponged the edges, and then attached everything to the base card, added the brads and some raffia.

Stamps: SU! Lighthouse and Lexicon of Love, French Flair
Paper: Paper Studio CS.
Ink: Color Box.
Accessories: Raffia, brads.


Here is the other card. I also cased this one, but can't remember who (sorry). My little brain couldn't seem to come up with anything masculine on its own. : ) This is simply background cardstock stamped with a journaling image I got at Target. Then a layer with three strips of torn paper edged with gold Deco marker and then the whole square edged too. Attached the eyelets and strung thin gold cording along one side. Celebrate was stamped and embossed in gold on a strip of blue CS, then the strip edged with the Deco marker and attached to the background. Added the curly hardware and voila`.

Stamps: Unknown set from Target, SU Wonderful Words.
Paper: Paper Studio CS, My Minds Eye DP.
Ink: Color Box.
Accessories: Eyelets, cording, embossing powder, Deco marker, hardware

Thursday, September 11, 2008

Masculine Birthday

Here's a straight forward, no frills birthday card I made for my son's best friend. Sometimes it is hard to make a masculine card without adding more frills and fuss.

For this one I attached the striped DP then the same brown cardstock as the base after attaching some ribbon (Hobby Lobby - I get several spools at a time when they have their 50% off sale . . . nothing better than 5 yds for 98 cents!). On top of this I put a tag I cut out with my Coluzzle template from a manila folder. I inked the edge with Distress Ink and patted the ink pad around on the tag. Then I used my handy dandy metal ruler again to distress the edge of the tag. I sew a lot and have a bin of extra buttons in my sewing closet. I dug around in there and found this button and stuck it on. I don't know what stamp set this is. I got several little sets at Target for $1 each a couple months back. I like the way this one turned out. : )

Stamps: Unsure.
Paper: Paper Studio CS, My Minds Eye DP from Hobby Lobby, manila folder.
Ink: Colorbox Queue, Distress Ink
Accessories: Button, ribbon, Coluzzle

Tuesday, September 2, 2008

For My Sweetie

Back in May my boyfriend and I celebrated one year together. We have taken lots of pictures of the things we have done together, with our kids, friends, etc., over past year. I thought that rather than give him a card, I would make this album.
This is a We R Memory Keepers Raw Goods album, 5x7 size. It a 2-ring binder and comes with 10 clear pages.
I covered the album with My Minds Eye DP from Hobby Lobby (of course ~grin~). I put narrow cording on the edges that move when it is opened, to conceal the raw edges there. I stamped Inkadinkado's Wine & Cheese stamp on ivory cardstock, cut the edge with decorative scissors then inked the edges. Attached it to the pink CS with dimensionals to pop it up, and attached that stack to the album. The heart I cut from a card that was given to me in another life and ended up in my scrap box. It even already had gold foil embossed ribbon on it...how convenient is that? : ) That gorgeous metal plate was put in as an extra with something I bought on E-bay. There are three different plates in this set and I just love them. I chose this ivory one because it went so well with the paper. The sentiment I put together from alphabet rub-ons from K&Company, with each individual letter rubbed on separately to form the words. I thought the sentiment and the stamp went really well with the whole theme of the book.
I included a shot of a couple of the pages. Some are more decorated, and each page has two or three pictures. These shots were of NIOSA (Night in Old San Antonio), which is part of our annual Fiesta celebration (somewhat like a Mexican Mardi Gras). It is a blast!! Also interspersed between the photo pages, I printed out the words to three different love songs that remind me of US. I printed them on DP that had a small faint image, then cut the edges with decorative scissors, inked the edge, and attached it to a 5x7 piece that I cut from manila folders and punched holes. I like the folder's thickness...not too thick but still sturdy. Each page was decorated completely different. I used different stamps, bling, stickers, chipboard, glitter, rub-ons, caligraphy...you get the idea. My boyfriend loved it! : )

Stamps: Lots of different ones.
Paper: Paper Studio CS and My Minds Eye DP from HL.
Ink: Colorbox Queues.
Accessories: We R Memory Keepers, bookplate, cording, bling, rub-ons, and a variety of other embellishments throughout the album.

Wednesday, August 27, 2008

...And Some More Thanks

Three more of the thank you cards I made for my daughter....

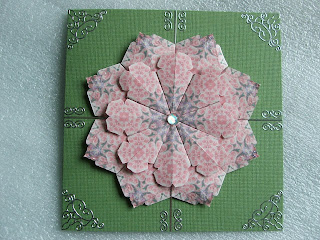
This card is a 5x5 size, textured cardstock from Paper Studio.
The medallion is made using tea bag folding technique. I printed this pattern from this site. It's so cool...you can choose from tons of gorgeous patterns, select the size and shape of the tiles, and print it right off your computer. If you choose the layout without cutting lines, these would make wonderful background papers!!!! Anyway, once these tiles were folded, I punched the tips of 8 of them with a Fiskars corner punch to give it a pretty edge. I took the next 8 and cut the end decoration off and then snipped around the flower pattern to give it a different shape. These folded pieces were then glued in layers to a circle of cardstock. You can't see it in the picture, but I put fairy dust glitter on the tips of the first layer. Added the rhinestone in the center. Once the medallion was attached to the background, the card needed a little more something, so I added the silver outline stickers.

Stamps: None.
Paper: Paper Studio CS, computer generated DP for tea bag tiles.
Ink: None.
Accessories: Outline stickers, rhinestone, glitter, Fiskars corner punch.

Here is another card from the Inkadinkado projects. I used Cuttlebug D'vine Swirl folder to emboss the card, then chalked the raised parts. The linen-look DP was from that pad that I don't now the name of. I stamped it with the Inkadinkado Elegant Hat stamp, colored the ribbon and flower and her lips with watercolor pencils. That was attached to a piece of ivory CS with inked edges and then to the background.

Added two layers of the shear peach ribbon. I put some glue on the brads and dipped them into fairy dust glitter, so they have a pretty sheen when the card is moved.

Stamps: Inkadinkado.
Paper: {aper Studio CS.
Ink: Colorbox Queue.
Accessories: Cuttlebug, chalks, watercolor pencils, ribbon, brads, glitter.

This last one started with gray textured CS. I stamped a white piece with French Script stamp in then pounced the same color ink across the strip and attached it to the card. I used Marvy Le Plume II markers to ink up the stamp from Prima Mktg, then tapped it once on a scrap to lighten it up and then stamped it onto cream CS. Inked the edge with the yellow Colorbox Queue (don't remember which color exactly, I have tons of these). Put that layer on a lavender layer, and then another inked cream one, and then finally put all that on the card. Added clear Dew Drops in one corner.

Stamps: Prima Mktg, Hero Arts.
Paper: Paper Studio CS.
Ink: Colorbox Queues, Marvy Le Plume II markers.
Accessories: Dew Drops.

Tuesday, August 26, 2008

Thank You's

My daughter asked me to make the thank you cards for her to send out after she started getting graduation gifts. Had no idea what I was getting myself into, but boy did I have fun! It started one by one, and each one was different. I ended up making 43 cards when all was said and done, all of them different. I will only torture you with six. : )

This one is a gate fold card I found on Scor-Pal's website. Scored and folded the base cardstock. The panels are covered with strips from DCWV Far East Mat Stack. I found a Paper Studio punch that can do either straight or this round border depending on how you situate the plunger on the base. It was very $$$, but I found it on the clearance wall at Hobby Lobby for $3.95...because the package was open. MINE! I was playing with this piece of glossy scrap paper and liked the way it turned out so attacked it by sponging on some ink, then stamped the Inkadinkado bird and chose the sentiment from a Stampin Up! set. Added the outline stickers then rhinestones in the center of the flowers. Also put rhinestones in the corners, and a couple of blingy flowers on the medallion.

Stamps: Inkadinkado, Stampin Up!
Paper: DCWV Far East, Paper Studio CS, glossy paper.
Ink: Colorbox Queues.
Accessories: Fiskars punch, outline stickers, rhinestone bling.


This card was soooo simple and I think turned out very, very pretty. I used black textured cardstock for the base. Used a Prima Mktg medallion stamp with gold metallic ink and stamped repeatedly for a neat background pattern. Cut the DP in a nice curve and attached it, then stitched the edge. Okay, that pretty paper is actually some old wrapping paper. I couldn't resist.

For the sentiment piece, I cut out a little rectangle and embossed the edge with gold embossing powder. I used the same stamp again and lightly tamped it across the rectangle, then stamped the sentiment in black ink. Took all of ten minutes to make this one, but I sure like it!

Stamps: Prima Mktg.
Paper: Cardstock from Paper Studio, old wrapping paper. ; )
Ink: Colorbox metallic and Queues.
Accessories: Stitching.

This one, uh...started out with a completely different image in my mind, but ended up with this. Oh well, happens. This one opens from the top. Started with gray CS and attached the plaid DP. I attached the strip of yellowish-green CS after inking the edge, and also a square flap of the same CS to the top. I didn't like the square, so I rounded it off. Boring. Out came the corner rounder punch and I scalloped the edge with that then used my tiny hole punch to make the holes. Inked the edge and...much better. I cut and embossed a piece of pale green with Cuttlebug's new Disney Rose Frame, pounced it with a darker green Colorbox Queue. Cut a circle of cream CS, sponged it a bit and then stamped the sentiment from an Inkadinado set, then attached it to the background and then the frame on top. Finally, used an Inkadinkado scroll on the flap. I attached a little velcro circle under the flap to keep it closed.

Stamps: Inkadinkado.
Paper: Paper Studio CS and My Minds Eye DP.
Ink: Colorbox Queues.
Accessories: Cuttlebug, corner rounder, hole punch.

Monday, August 25, 2008

One For My Daughter

Here is the "card" I made for my mom to give my daughter for graduation. It's called a Scor-Pal flip-flop book.


I did not have any chipboard, so I cut the covers from manila folders and covered those. I like that they aren't so thick but they are still firm enough not to bend easily. The DP is from My Minds Eye from Hobby Lobby. My truck seems to be on auto pilot anytime I get within a mile of that store and before I know it I am in their parking lot. HA! That's my story and I'm sticking to it. : ) I used a grosgrain ribbon for closure. The cover sentiment was embossed with clear powder on white ink.

Here is the inside of the book. You can tell the Hamptom Arts graduation set was pretty popular recently. Each of the words was embossed with clear powder. Added floral border stamp from Hero Arts. My daughter loves dragonflies and wildflowers, so I stamped those images on the panels with her "through the years" pictures. Isn't she a doll?! : ) Though it can't be seen, the other side of each of these panels has a nice sentiment on it. Inside the front cover also has a green butterfly stamped and embossed, and the inside the back cover is where my mom wrote a sweet message to her granddaughter.

Stamps: Inkadinkado, Hampton Arts, Hero Arts.
Paper: Manilla folder, My Minds Eye DP, Paper Studio CS.
Ink: Colorbox Queues, Staz-On.
Accessories: Ribbon, photos, embossing powder, Scor-Pal.

Sunday, August 24, 2008

A Flippin Graduation Card

I made this card for my niece for graduation. I found it in the projects section of the Inkadinkado website. They call it a flip card. Basically four rectangles scored, strategically glued together, and then decorated. When finished it folds and unfolds in different directions, revealing a new "face" each time. Almost like four different cards in one. The main techniques used were stamping, embossing, and paper piecing. Then bling added throughout. Have to have blingage! :) The front main images were stamped with clear embossing ink on plain white cardstock and embossed with clear powder. Then the background color was sponged over the whole piece and ink wiped off the embossed part. That piece was then attached to another background with Corner Adorners (love those, have a whole bunch of them!). The words and grad caps were stamped with colored ink and embossed with clear powder. Her name I cut from a Scraparatus die using my Cuttlebug.
I used stamps from three different Inkadinkado sets as well as Hampton Art's graduation set. Oh, and a flourish stamp from a set I got at Target. The little trailing butterflies below were cut with my Cricut from plain white cardstock and then a thick layer of metallic ink was sponged on them.
On the last page is a little envelope I made from fuschia vellum, and that is where I put her gift...moola! The sentiment was printed off my computer. I also used outline stickers on different parts of the card.
It ended up being a 6 x 6 card, so rather than try to make an envelope, I wrapped it in pretty tissue paper and tied it with raffia. This card was so much fun to make!

Stamps: Inkadinkado, Hampton Arts, unknown set from Target.
Paper: Paper Studio CS, My Minds Eye DP, vellum.
Ink: Colorbox Queues and Petal Point metallic.
Accessories: Embossing powder, Scor-Pal, Cuttlebug, Scraparatus, rhinestone bling, outline stickers, Cricut, Corner Adorner.

Saturday, August 23, 2008

Series of Grad Cards


I made four graduation cards for my niece and my daughter...one for each from my mom and then from me. I'll be posting those over the next several days.

I got this card idea from a book I have. It took two pieces of cardstock glued together in the center, window was cut out, then the card was scored and folded. The center panel was scored and folded in opposite directions and put together on the main card via slits. The side panels were decorated with DP and have strips with stamping on them. The little panels with the photos are held down with a photo tab and flip open to reveal a sentiment inside each one.

Again I used Clearly Wordsworth graduation set. I also used an Inkadinkado stamp and a damask stamp from The Paper
Studio. The small letters for her name were a Scraparatus font cut with my Cuttlebug. The striped paper is from an unknown company. The other background DP is from My Minds Eye.

Once folded this card was pretty thick, so I made this coordinating slide-out matchbox to put it in. This card was completed with folding, stamping and paper piecing. It was much easier to make than I thought it would be.

Stamps: Clearly Wordsworth, Inkadinkado, The Paper Studio.
Paper: Unknown striped cardstock. Paper Studio CS and My Minds Eye DP.
Ink: Colorbox Queues,
Accessories: Stickers, Cuttlebug, Scraparatus.

Friday, August 22, 2008

A Couple of Invitations

A close friend of mine was giving a lingerie shower for her niece last year and asked me to make the invitations. This stamp came to mind immediately; it is called "Beaded Bodice". I masked the skirt part so it would look like a corset, stamped it with black ink onto red CS, embossed it with black powder, and cut it out. I glued on some beads and the ribbon "garters", then popped it up on some dimensionals between the computer generated words. Added some outline stickers for a little more glitz. It looks pretty flat in this pic, but IRL it looks very nice. Kept the background simple so as not to detract from the main image.

Stamps: Stampendous.

Paper: Christmas Red CS.
Ink: Colorbox Black.
Accessories: Embossing pwdr, Outline Stickers, ribbon, beads.

This invitation is one I volunteered to make for my kids' high school JROTC Military Ball last December. I did these in several sessions, as it takes a while to make 250 invitations! Coincidentally used the same red CS as above, ran it through my Cuttlebug in the D'vine Swirls folder. The "masquerade" banner was printed onto some gray mottled stationary paper I got from Office Depot and then cut with deckle edge scissors. The scroll element was from black CS with Cuttlebug Curls & Swirls set. It was the 40th Annual Military Ball, and since at the time I did not have any stamps with numbers, I used Cuttlebug Baby Face font to cut out the 4 and 0 from some craft foam, attached those to a small acrylic block and stamped and embossed the 40 with silver powder. The inside information was printed onto vellum. I then punched a small hole with my Scraparatus and inserted the thin cording after tying the ends in a knot to make a small tassel. Gave it a formal look. The 1SG liked them . . . I get to do the invites again this year! : )

Stamps: Numbers made from Cuttlebug font set.
Paper: Christmas Red CS, Black CS, stationary paper, vellum.
Ink: Clear embossing ink.
Accessories: Cuttlebug, embossing powder, deckle edge scissors, Scraparatus, cording.

Thursday, August 21, 2008

One of My First Cards...A While Back

This was for my sis-in-law when she got a job promotion. I have no idea what paper this is, but it came in an 8x8 pad along with a matching album. The album I didn't want so I gave it to a friend and I dove into the paper. : ) This was also back before I had any Nesties, so that scalloped oval frame was hand cut and the window I cut with a Colluzle. Same with the inside oval frame; I put that there to sandwich the acetate "window" between it and the main cardstock and to hide the edge. It's definitely not perfect, but it turned out okay.
I like pinks and grays together, so used gray as the base and covered the front with this pink stripe. I thought this Fluffles stamp was just perfect. I stamped him on white cardstock, colored him with pencils and cut him out separately from the hat. I glued the hat to the front of the window and then stuck on some Cuttlebug flowers and added beads to the center of each. The corner filigree and "base" below the window are also from a Cuttlebug die set. The base is actually an inside part from the filligree. How's that for not wasting anything? (*grin*). Congratulations was cut using a Scraparatus die in my Cuttlebug. The "my hat's..." sentiment on the stamp would have had too much of an arch, so instead I attempted to write it as neatly as I could, but my pen was being moody so it did not come out perfectly.


Open the card...and there is Fluffles in the box! For the celebration on the inside I wanted to make it look like the balloon and stuff flew out of the box when the card was opened. The little balloons are Scraparatus dies, the stars and confetti are from a punch that a friend gave me, there is no name on it. I did the balloons in vellum so they would have somewhat of an opaque ballooney look, and popped them up on dimensionals, drew in their strings.


Stamps: Fluffles by Stampendous.
Paper: Unknown cardstock, vellum
Ink: Colorbox, pencils.
Accessories: Cuttlebug, Scraparatus, acetate, beads

Wednesday, August 20, 2008

My Card For My Son

So here is the card that I made and gave my son. I started by embossing the green cardstock in the Cuttlebug Diamonds in the Rough folder. While it was still in the folder, I rubbed the side of a bronze crayon over the raised parts. Keeping it in the folder insures that the raised parts don't get mashed back down. After that I sponged ink over the entire surface, let it dry for a bit then went back and wiped the ink off the crayoned parts.

Used an oval Nestabilities to cut and emboss the background for the watch. The watch is from the Timeless Heritage Spellbinders die. I then ran it back through and embossed it, then sponged white ink to bring out the embossing. I stamped the sentiment with Kitchen Sink stamps. Finally, I added the brads and the twine and voila'. Didn't take long to make this one.
I wasn't overly impressed with the way it turned out, but Ty really liked it and that's what counts, right?

Stamps: Kitchen Sink.
Paper: Paper Studio, My Minds Eye.
Ink: Colorbox Queues, crayon.
Accessories: Nestabilities, Spellbinders, Cuttlebug, brads, twine.

Tuesday, August 19, 2008

My First Attempt at Posting...

Hello there! I am new to blogging, still feeling my way around here. Had to get help from Michelle to even figure out how to add a picture. Duh...look for the picture icon next to the ABC one. : ) Thanks Michelle!

I got her Fabulous Flowers instructions after seeing her gorgeous pictures, and now will go rummage through my stamps to see what I can come up with as substitutes since I do not have any of the stamps she has listed.

Anyhoooo...on to this post. This is the card I made for my mother to give my son for his 15th birthday. The letters were die cuts, and I put a "bubble" of Glossy Accents over the gray circle to give them dimension. I do not remember who I cased; I did not realize at the time I would be starting a blog but have done so at the request of friends to toss my cards on here for them to see. I will be adding other cards I have already made, with unknown casings (sorry again), and will make sure I have info for any future cards.

I do not use any particular brand of cardstock, mainly what I get on sale at Hobby Lobby. Have a wide range of DP as well as stamps, though I have been lucky enough to get some wonderful Stampin' Up! sets on Evil-Bay. So here are the stats for this card:

Stamps: Prima Mktg, Hero Arts, SU! Linen BG.
Paper: Brown cardstock, torn pale yellow DP "aged" with ink; die cut letters.
Ink: Colorbox Raven Black, Chestnut Roan.

Accessories: Glossy Accents by Ranger, Dimensionals.