Wednesday, August 25, 2010

Joan's Tag Challenge

This week over at Joan's Gardens, her challenge is to create a tag using something heavier than cardstock, use old and vintage looking colors, and add some stuff from our stash.  I got some Grunge Paper about a month ago and hadn't used it yet, so I pulled it out to play and ended up making two.  I cut the Grunge paper then sprayed them each with several different colors of Glimmer Mist.  After drying, embossed them using two different folders.  Added some flowers I made, some butterflies cut with MS punches, added the charms.  Made the tiny pockets from stash paper and inserted a little card into that for writing on later. 

Thursday, August 12, 2010

It's Embossable at OCC, and a Mojo Sketch

Good day everyone!  This first card I made following the MojoMonday151 sketch.  I really liked this one.  I had this image sitting on my desk since I got back from Vermont in May.  I found the stamp at a scrapbook shop in Memphis.  I stamped it with dove gray Stazon onto glossy cardstock.  It doesn't show up well in the picture, but looks pretty IRL.  Cut out with Spellbinders Labels 11, as was the Kraft CS mat,  inked with Distress inks. Base card is SU! CS.  Background DP is from Mirabelle stack by The Paper Studio. Used Cuttlebug embossing folder on HOTP paper, running it through several times to get the "cracked" look from the paper breaking. MS Cornice edge punch, Spellbinders label for sentiment, which is from SU!

For this next card, a friend asked me to make her 30 thank-you cards, with specs being simple and earthy with a little glitz.  So here's my take on that.  I decided to use this card for this week's Our Creative Corner 
challenge...embossing, any kind of embossing.  This is a Quickutz  folder Shelbie picked out on our trip back from Vermont, from the same scrapbook shop in Memphis.  Embossed the paper, inked and distressed the edges, attached to base card.  Added yellow Stickles for the glitz.  Somehow I smudged some ink onto the CS, so it got covered with the tiny butterfly.  Thought it looked cute, so half the cards got butterflies. :)

Monday, August 9, 2010

Thank You Barb!

Funny how things come up. Back at the end of June, Barb, the wonderful blogger from Made for Keeps commented on a video I had posted on my Facebook page of me zip-lining in Jamaica.  Her comment was that they have two zip lines in Branson and that she wanted to try it.  So ~squeaks and squeals~ (the rusty gears started turning in my mind-haha!), a thought emerged, and I sent her a message that I would be taking my daughter back up to Norwich University in Vermont at the beginning of July, we could route our trip thru Branson, MO so we could try out one of the zip-lines there.  So plans were made.  Now, Barb and I had never met in person but we had communicated thru out blogs and e-mails, then on Facebook.  So, Shelbie and I got to Barb's house late in the evening, and I felt like I was coming to visit a friend I hadn't seen in a while, not like I was meeting someone for the first time.  Barb is a such a warm, sweet person, and her husband Jerry is a delight.  My daughter is contracted with the Navy, will commission as an officer when she graduates and Jerry is ex-Navy...so they had lots to talk about.  I fell in love with Barb's crafting cave.  Oh my, the goodies she has!

We spent two nights and a day with Barb and Jerry before continuing on to Vermont.  During our day there, we did the zip-line from the 230-foot tower at Shepherd of the Hills.  It is about half-mile long, takes almost a minute to get to the bottom.  It was wonderful!  From left to right in the picture  is Barb, me, a charming young man who got stuck with us three ladies, and Shelbie.  Jerry took this picture from the top of the tower.  Such fun!  We spent the rest of the day wandering around Branson, with Barb and Jerry showing us different sights and attractions.  I felt  a wonderful kinship with Barb, and I hope we get to see her and Jerry again soon!

In the interim since getting back from Vermont, making this card and intending to send it, job issues came up, Tyler was in an a bad accident and things just seemed to get derailed and I've had a hard time getting back on track.  Tyler is doing well, seems back to normal though having some sleep problems (stress?).  We got the police report and learned that there were six vehicles involved, not four like we originally were told.  The person who caused the accident admitted he was distracted...saw a fast food restaurant and was thinking about getting a burger, when he looked straight again he didn't even have time to hit his brakes.  So a big delivery truck at 40 mph causes a lot of damage, injuries, [and a fatality] to five vehicles in front of it who are stopped at a red light.  I am so thankful Tyler is okay and doing well.  But I had forgotten to post this card, and I finally remembered last week that I hadn't even sent it to Barb!  Sorry!!

This card followed the Mojo Monday 146 sketch.  I used a Tim Holtz embossing folder for the base and the vellum oval, slathered them with distress ink.  The strips are from a DCWV pack, inked those edges as well.  Sentiment is from Inkadinkado, stamped with distress ink, cut out/embossed with Wavy Squares Spellbinders dies. 

Friday, August 6, 2010

Stamp Simply 151

Three cards in two days, hope that means the mojo is coming back!  I made this card for my mother, to give to my son for his birthday, which was yesterday.  Oops, Gramma forgot.  Tyler understands, considering his Gramma, my own sweet mother, forgets her own kids' birthdays.  Nothing pathological, she has just always been that way.  I saw Sharon's Stamp Simply challenge late last night, so I got up early this morning to make this card for my mom to give to Tyler.  The challenge is a one-layer card.  thankfully, can use some embellishments, so I added some brads to the Kraft CS I embossed with this Tim Holtz folder.  Added some distress ink to the embossing and used it for the sentiment.  Voila...quick and easy and done in less than 10 minutes!

Thursday, August 5, 2010

Multiple Challenge Card

Hey, two posts in one day! :)  I spent some time during my lunch break today hopping around blogville and came across some challenges I wanted to try.  I ended up with one card to fit them all.  Challenges will be listed below.  The base card is SU! cardstock.  The image is from Magic Moonlight, printed on canvas.  Corner punches are Martha Stewart.  Stamped images are from Crafty Secrets Fairyland set.  Sentiment, which is a John Denver song title, was printed from my computer, cut and embossed with Spellbinders Fancy Label and attached on dimensionals.  The two flowers are made following Selma's vellum flower tutorial. I love how they turned out! 

Joan's Gardens Challenge #9 - Pink & white card, with four corners punched, preferrably with a Martha Stewart punch.
Crafty Secrets Forum Challenge on SCS - To use fabric on our project, along with a Crafty Secrets item.
Stamp Simply #149 - To use two of...something. 
Simon Says Stamp Challenge - To use a song we can't get out of our head in our project. 

Mojo Monday 150 Birthday

Today is my son Tyler's 17th birthday. Where did the time go? He is such a wonderful young man, and I love every minute I have with him! Crazy that three weeks ago today I got a phone call all parents dread. Tyler was involved in a serious auto accident in which the van he was riding in was struck from behind while they were stopped at a red light. Four vehicles involved, with the van being sandwiched between the car in front of them and the one behind them, which was hit by a commercial delivery truck. There was a fatality in the first vehicle hit, Tyler suffered a head laceration and concussion, Tyler's stepmother was in ICU for four days with serious injuries, and one of his friends was also injured in the accident. Everyone is home now and on the road to recovery. I still slip into Tyler's room at night to check on him. Everything can change in a flash.

This summer has been busy and my mojo has definitely suffered. I have made several cards and some sets of cards for friends, but Chuck has been using the camera for his work so I haven't been able to take pictures of all of them, or wasn't able to get the pics off the camera disc before he had to use it again. Hard to believe it has been three months since I posted anything! The clinic where I work is being sold at the end of September, so I have started looking for another job. Still doing massage therapy after regular work hours and hoping to build clientele there to fill in when the clinic closes.
So in trying to get my mojo jump-started, I used this week's Mojo Monday 150 sketch for Tyler's birthday card. Happens to be the first one of the month so there's a contest too. Yay! Used SU! cardstock for the base card. DP is DCWV Rustic Collection; the smaller DP scraps are Hot Off the Press. Sentiment from JustRite, cut/emboss with Nestabilities. All ink is Distress Ink. The image is from Inkadinkado Horse set. Tyler loves horses, and I was trying to make this a masculine card without being too juvenile. I think I succeeded. :)

Monday, May 10, 2010

Fancy Fold Mother's Day Card

I am posting this card today so that my mother would not see it before Mother's Day. Today is her birthday, so will be posting her BD card tomorrow...again so she won't get a sneak peak at it. I'm using this card for Sharon's Stamp Simply #138...Mother's Day.

I was stalking Connie's blog a while back and saw this wonderful multi/fancy fold card she created (she has more too!) and followed the links she provided for tutorials. I love different folds for cards.

I used the new Spring Bouquet stamp set from Flourishes, which I really like. Love this gorgeous bouquet. I stamped it with Stazon and colored with Primacolor Pencils blended with baby oil, then chalked around the image. Traced around the inside of the 2nd largest Labels 10 Nesties and cut out the image by hand so I could have the flowers extending beyond the margins, then cut a mat from the largest die. Stamped around the edge of the mat using Perfect Medium on a Crafty Secrets Flourish stamp, then applied Perfect Pearls. Gave it a pretty Ole-timey frame look, I think. : )

Added the lavender flourished DP to one panel. The rest of the panels have either plain white CS or a mesh patterned CS from MME that I inked with Distress Inks and used another flourish from the Crafty Secrets Flourish set around the borders.
The sentiments are from Verve's Because of You and Flourishes Spring Bouquet set.

Added a couple MS punched butterflies, layering the one on the front with gold vellum and added Stickles. A few flat-backed pearls on the front and...voila'. A pretty Mom's day card!

I have a couple more creations to post this week, then I'll be on the road for about a week. I am flying up to Vermont Thursday to get my daughter. She can't leave her car on the college campus for the summer, so I'm going up there to drive back with her. We will head out Saturday after the graduation ceremony, so we can see one of her friends she went to high school with graduate from Norwich. We are going to do a week-long road trip coming back so we can do some sight seeing along the way. I have some friends in York, PA and Apex, North Carolina, so plan to make stops there to visit with them while we're on our way back. We both are really looking forward to the trip!

Saturday, May 1, 2010

Birthday for Audrey

Today is my friend Audrey's birthday. A bunch of are getting together at Rio Rio Cantina on the Riverwalk to celebrate. I made this card and gift set for her. The card just happened to fit into two challanges: Whiff of Joy Challenge 77 to make a gift card, and Sharon's Stamp Simply Challenge to make a joy fold card.

I chose this WOJ image because Audrey loves to cook, and we got her a gift card from Williams Sonoma. I colored her with Prismacolor pencils blended with baby oil. Cut and embossed the image with Spellbinders Labels 8; chalked around her while still in the die, then inked the edges. Mounted that to brown CS cut on the fold with the largest Labels 8, and attached a smaller label to the inside to write on. All DP is Basic Grey LilyKate. Flowers cut and embossed with Nellie Snellen punches, sprayed with Glimmer Mist, and added some Dew Drops. Attached a little pocket inside to put the card in. Will also be including a one-hour maternity massage for Audrey.

Thursday, April 29, 2010

Exploding Gift Card Holder

When Diane posted the Heartwarming Vintage/Crafty Secrets bi-weekly challenge on Papercraft Planet to create a gift card holder, my mind went immediately to this creation. I had seen the "exploding" boxes on different blogs, but completely fell in love with Elaine's Magic Boxes. Her designs and details are jaw-dropping. Mine is much more simplistic, and I really like how it turned out.

This box is for a friend of my daughter who is getting married 5/22. Still can't believe Jose is getting married. Jose is from Chile, and he and my daughter met and became friends in 8th grade. Many good memories that include him, but will write a brief of my favorite "Jose moment" at the end of this post. :)

The pictures aren't great because they were taken us
ing a flash; no natural light because it was night time, so the colors are washed out a bit.

Using Versafine, I stamped each outside panel with stamps from Crafty Secrets "Cherish" and "Flourishes" sets, then embossed with gold EP. Inside each flourish I put the bride's and groom's initial using Justrite Font, embossed that as well. Used Deco corner punch and then inked the edges with Pumice Stone Distress Ink. Mounted those to metallic lavender paper, and then mounted to the box side panels. The lid was made from the same metallic lavender. Used MS Cornice edge punch for the sides. Cut and embossed a scalloped square Nestabilities and attached that to the lid. MS med and lg water lilly punches were used for the flowers on top. Ran them through a CB to add more detail to them, then attached to top. Some flat-backed pearls were added to the center of the flowers, and a tiny one in the center of each side of the top.

For the inside panels, I mounted this gorgeous gold embossed paper I've had in my stash for eons to the stiff backer board from a pad of decorative paper. This gave the box good stability, and also added perfect weight to give a good "flop" effect when the lid is taken off. I made and attached the stand for the card, then stamped and embossed the corners of a square piece of CS with a CS Flourish. Cut the square on the diagonal and attached it over the card holder. All the flowers and leaves were made from various punches, painted with Twinkling H2O's or sprayed with Glimmer Mist, and attached in various places with Stickles. One was attached to each panel. Four others were attached to acetate strips, with the other end being threaded through the flourished panels before it was attached. When the box opens, the panels flop down and the flowers on the acetate strips spring outward and sway. Again see Elaine's blog for more of those.

Okay, here's the "Jose moment": About five years ago I was in the grocery store checkout line with my daughter and six of her friends, getting supplies for a party at our house. All of these kids were in ROTC together, and all called me Mommy (still do). As I was about to pay for our goodies, one of the boys, Paul, was trying to get my attention and started bobbing up and down and saying "Mommy, Mommy, Mommy" over and over. The others quickly followed suit, and soon there were seven teenagers bobbing up and down and repeating "Mommy....". Not loud or disturbing anyone. The cashier looked at them - and me - with a strange expression. I told them to shush and they all piped down right away. Jose happened to be standing right next to me. He flashed his brilliant smile at the cashier, and in his very thick Chilean accent said "we all have different daddies". Ay yay yay. I just shook my head, and then we all started giggling. Still not sure to this day that the cashier didn't think they were all mine, all from different daddies. : )

Thursday, April 8, 2010

Tiny Note Cards

This is the other post that was supposed to go up over the weekend. Let's see if I got that scheduled post thing right this time. : )

I had such fun making these. I received a little card tucked into a gift bag and that is where I got the idea for this fold. The final size of these is 3x3, a tri-fold. I used Kraft CS. After folding I used the SU! scalloped border punch on the front edge. Martha Stewart Hydrangea pop-up punch was used for the flowers. I punched several out completely from scrap paper and used them for masks so I could emboss the background. Used part of the SU! French Flair BG stamp, stamped with Versamark and embossed with clear EP. Then I colored the flowers with chalk inks, and added Spica glitter pen to the edges of the petals. Also inked the surface under the top layer to coordinate with the flower petals. I made a set of eight, two in each color.

Wednesday, April 7, 2010

A Missed Post

I had scheduled a couple of posts that were supposed to go up while I was gone to Houston over the weekend. Or so I thought. When I realized that they hadn't posted, I thought maybe there was a problem with Blogger. Before I sent a message, I looked over few things and found out it was a PEBKAC error. I hate those. PEBKAC error = Problem Exists Between Keyboard and Chair. In other words...I goofed. So here is one of the posts that was supposed to post while I was gone. Grrrr... The other I have scheduled to post tomorrow, to see if I corrected that PEBKAC error. : )

While my daughter was home for spring break, she and I went to a concert at the Austin Rodeo. Before it started we were wandering around the vendor booths, bought some silly hats (and I will wear mine when we go tubing this summer!) and some pretty rings. We came to one booth that had some beautiful plaques done in sort of shabby chic. Shelbie looked at one she liked, but when she saw the price she was shocked. So was I! The lady was selling these plaques for $40-60. I told Shelbie I would make her one, and this is what I came up with. It was fun to play with different stuff. I think she'll like it. The picture on the left is a bit washed out from the flash, but you see the overall shot. The smaller one below is more true to color.

I got the pine plaque at Hobby Lobby, painted it with acrylic paint. Intentionally cut the DP so it would not match up perfectly. Scruffied that up with an emery board and then used Mod Podge to glue it to the plaque. Used the beautiful Maribel image, stamped with Ranger archival ink and colored with Distress Inks, and cut her out with deckle edge scissors. Made a rough mat with the same scissors and used Distress Ink on it as well. Then glued on various sized paper roses, punched some leaves and added veins with an embossing tool. Added Stickles to the tiny rosebuds before attaching those, then added the butterfly brad after I attacked it with copper Stickles on the wings. The sentiment I printed from my computer, onto plain copy paper that I "aged" by dunking into some water to which I had added a couple drops of Tea Dye Reinker. I tore the edges while it was still wet and then inked them. After it was dry I sprayed it with two different colors of Glimmer Mist. You can see the sheen if you click on the image. I glued on the Spellbinders Doodleparts flourish, added some flat-backed pearls. Used three different ribbons in different colors, one organza and two satins for the hanger, and threaded faceted beads onto the thinnest ribbon. I attached an eye-ring to the bottom center of the plaque and to that attached the filagree medallion. Another eye-ring, some tiny beads and more faceted beads, then an angel charm at the end, and that dangles from the bottom. Sorry so dark. I'm using a different camera and haven't made friends with it yet.

Blog Candy Winner!!!

I know, I'm late. Sorry! We went to the wedding in Houston and all was well...until Saturday, the day of the wedding. I woke up feeling like a truck ran over me - sore throat, cough, fever, aching. Ugh. Okay, I'll have a little cheese with my whine. : ) Made it through the day, through the wedding, and dropped like a rock after that. Got home Sunday afternoon, went to bed. Finally got out of bed yesterday, after missing two days of work. So here I am now, about 70% better and ready to give away some candy!!!!

I wrote all the names on pieces of paper and put them in a jar, shook it up and pulled out a name. No, I didn't take a picture of that process, because I don't have a cute little (anymore) girl to draw the name, and my cute 16 y/o son would have preferred doing housework than me taking a picture of him pulling a piece of paper from a jar and posting it on here. Stinker. : ) So without further ado:

The winner is....Debbi ! Yay! Clap, clap, clap! : )

Please e-mail me by 9 p.m. (CST) Saturday night, April 10, with your snail mail addie so I can get this box sent to you.

Wednesday, March 31, 2010

Heartwarming Vintage 3D Project

SCROLL DOWN FOR BLOG CANDY BELOW THIS POST!!!!

I absolutely fell in love with these shadowbox diecuts when I saw the first post from CHA back in January! So when Jan posted this 3D Crafty Secrets/Heartwarming Vintage challenge on Papercraft Planet, I had to jump on it! Jan sent me this gorgeous gold sheen diecut and I went to town. All of the gold pieces shown are part of the diecut kits. These diecuts can be decorated on both sides and closed to mail or hand deliver. But I did mine as a diorama, so it will remain open, and the backside is not decorated. The Crafty Secrets "Love" image on the left panel was embossed with gold EP onto ivory vellum then attached over a piece of CS from DCWV Luxury stack. The frame around it and behind it were stamped with Crafty Secrets Flourishes using Distress Ink. Ditto for the right panel. The center image from this site was printed from my computer, then image was cut/embossed with Spellbinders Labels 10 and attached on foam tape. The sentiments were printed from my computer, cut/embossed with Spellbinders Labels 10 and Fancy Tags dies, then sponged. Both were attached on foam tape. Embellishments on left panel: Prima roses misted with Glimmer Mist, punched leaves, Spellbinders Renaissance Heart charm with Stickles. Center panel: More Prima roses, punched leaves, Spellbinders Doodleparts swirl with rhinestone, cameo charm, Liquid Pearls on scallop. Right panel: Yep, another Prima rose, punched leaves, and flat back pearls.

Celebrating With Blog Candy!!!!!!! EXTENDING DEADLINE

Start date for blog candy is 3/14/10. This post will stay at the top until it ends 3/31. ETA 3/28: I will be extending the end-date for this blog candy to 4/5, with winner chosen 4/6. I completely forgot I will be out of town from 3/31 to 4/4. Will be in Houston to be a bridesmaid (isn't there an age limit on bridemaids? hee hee) in a friends wedding. I didn't forget the wedding, just when I was supposed to be over there. So there will be more chances to enter with comments on new posted cards - I will have them on scheduled posts - so leave some comments! : ) I have also added another item, link in the list below.

Last February I had offered some blog candy in conjunction with another event that was going on. This time around I decided to offer some blog candy as a celebration. This past Thursday I had my second annual PET CT scan. As with last year, this scan was free of any signs of recurrent cancer, making this my third year to be cancer free! [Doing the happy dance]. So to celebrate...CANDY!!!


Here are the rules:
  1. Become a follower of my blog and post this blog candy on your blog, and you’ll be entered for a chance to win. Leave a comment letting me know you’ve done both, so that I can verify and put your name in the basket. If you are already a follower, post the candy on your blog and let me know, and you're entered.
  2. The blog candy will run until 3/31/10 at midnight CST. If you come back and leave comments on any subsequent posts after this starts and up to the deadline, you will be entered for another chance to win for each post you comment on (one comment per individual post, please). I plan to get back into the action and remember to post what I've made. I've been forgetting to do that. :(
  3. The winner will be chosen by random draw on 4/1/10 and will be posted on my blog that day. Please check back that day to see if you are the winner, and if you are you will have 72 hours to respond via e-mail with your address so I can get your goodies shipped out. If the candy is not claimed in that time, I will select another winner.

Here’s a list of what is included with the blog candy:
Cuttlebug Asian Bundle. Includes (4) 5 x 7 embossing folders, (4) 4.25 x 5.75 folders. These are gorgeous!
Basic Grey “Eskimo Kisses” 6 x 6 paper pad.
2 silver, 1 gold sheet of outline stickers (Anita’s Art Stamps)
1 sheet Spring theme vellum stickers (Sticker King)
1 sheet floral rub-on transfers (Royal & Langnickel)
1 sheet ‘High School Sayings” rub-ons (Me & My Big Ideas)
Cuttlebug ‘Invitation’ embossing folder (out of package, never used)
Blue label tin
Tiny glass bottle with cork
10 tags with cord
1 bottle Stickles Fruit Punch
1 sheet dimensional floral/frame stickers
Adhesive Metal Words (Colorbok)
Lattebella stamp from Stamping Bella (Mounted on EZ Mount, never used)

Paper Studio 1-7/16” circle punch.
3 large and 6 small spools of ribbon, various makers.

Ultimate Crafter's Companion - This was given to me as a gift, but I have only used it once just to check it out. I already have The Enveloper from this same company, a Scor-Pal, and then was more recently given Martha Stewart's score board, so really don't need another item that does all the same things sitting around collecting dust, so I've decided to add it to this blog candy.

Sunday, March 28, 2010

Better Late Than Never

I've had this card made for over a week but Chuck was using my camera for his work so I wasn't able to get a shot of it until yesterday. I made this card for my girlfriend Deborah, who was my partner in crime while both of us were without jobs. We would meet at Dairy Queen for a Blizzard, or for lunch, or go to Enchanted Rock...Lots of fun times talking about anythind and everything. Then I got a job last summer and our meetings spread out. Deborah finally was able to find a job a couple weeks ago. I made this card as a good luck/congrats card for her. Made it following Sharon's CAS/texture challenge, clean and simple with texture.

I ran the cardstock through my CB with a new folder I got at Custom Crops. I added some Fruit Punch Stickles to the stars for a little bling. Stamped the sentiment from Crafty Secrets Glamour Girls set, cut that out with scalloped rectangle Nestabilities, inked the edges and attached. This was about a ten minute card. Took longer to pick out the colors, sentiment, etc. : ) I've made four other cards this past week, two sympathy and two get well cards, but could not post them since I didn't have my camera and they need to get mailed.

Sunday, March 14, 2010

Papercraft Planet Crafty Secrets Challenge

Wanted to give this challenge that Darlene posted on Papercraft Planet a try. Here is my take on Springtime flowers and keeping it clean and simple (CAS). Don't know how successful the CAS was, but there are flowers! : )

I Cuttlebugged the base CS, then chalked over the leaves with Pebbles Chalks. I've had this image colored for months (along with many others), but then went MIA on my blog and never used it. I love this Crafty Secrets Garden Girls set! The image was colored with Prismacolors blended with baby oil. I cut it out with the new Spellbinders Big Scalloped Ovals, chalked while still in the die, then inked the edge. The larger flowers were some in my stash, I assume some Primas. The tiny flowers I cut with a Cuttlebug die, also added some to the center of the bigger flowers. Tiara Stickles in center of all flowers. Corner punched all four corners.

Stamps: Crafty Secrets Garden Girls.
Paper: Stampin Up! and Paper Studio
Ink: Colorbox Queues.
Accessories: Cuttlebug leaf embossing folder, Cuttlebug flower die, Prima flowers, Stickles, Pebbles Chalks, Spellbinders Big Scalloped Ovals (Lg), corner punch.

Tuesday, February 16, 2010

Butterfly Box

I needed a quick little gift box for some little chocolates (Hershey's kisses, Andes Thin Mints, etc.), and I came across this gorgeous box on Tosh's blog, and I followed the link to Kristen's blog and her tutorial. Both theirs are just beautiful. This is what I came up with and was kind of rushed to get it finished. Maybe the next one will be better, because I loved making this and can see so many future possibilities!
Papers used are from Basic Grey, Hot Off the Press, and Cosmo Cricket. The butterfly was cut on my Cricut and I added Stickles to some of the borders. hard to tell, but the right wing is attached a little higher on foam tape. One big Prima flower, and the yellow and white ones are paper flowers that were in the clearance aisle at Michael's. They were in bouquets that looked like they had been run over by a truck, but I cut each blossom off and fluffed it up and they are really pretty. I attacked them with Stickles to give them some sparkle. I don't have any tiny drawer handles or pulls, so I used a charm from Hobby Lobby, attached with a brad for my drawer handles.
Stamps: None.
Paper: Basic Grey, Hot Off the Press, Cosmo Cricket.
Ink: Colorbox Queues.
Accessories: Charms, brads, Kaiser pearls, Michael's paper flowers, Prima flower, Stickles, Cricut, leaf punch, foam tape.

Tuesday, January 26, 2010

My First Official Challenge...This Year!!

Wow...two posts, two consecutive days. Woohoo! : ) I had wanted to do Sharon's ssnotime120 a couple weeks back, to use something new, because I have gotten new toys. But that one slipped by, so here we are at ssnotime123--Very Vintage, and I'm actually combining the two. Three times. haha. There are three cards, all pretty much the same but different color scheme.

The whole feel to the cards is vintage (my take on it anyway). The new here is the stamp. Her name is Maribel. I first saw her on this post in September of 2008. She's not available here in the states, but long story short, it took a lot of patience and several visits to different shop sites in Europe that retail the stamp before I could bring her home. I love this image! While the cards may look a little involved, they were actually very simple, as the challenge states. : )

This images comes out best when stamped on glossy cardstock with archival ink. I only had one small piece left in my stash so I stamped her once on that piece and a couple more times on some photo paper. The latter didn't come out as well plus had some excess ink, but they still looked good. I colored them with re-inkers and a water brush, then sponged around her. I cut out the images and then a mat for each, clipped the corners. The base card is SU! kraft CS, and the card is 5.5" square. I stamped a Crafty Secrets flourish in coordinating color along the top of the base. All the DP is from DCWV Once Upon a Time mat stack. I used a different border punch on each. All the flowers are Prima flowers, except the big blue one. I made that one. The small roses on the green and maroon card were white, but I spritzed and dipped them in Glimmer Mist. Different leaf punches for each, and some quilled curly-ques. I added a tiny flower on the maroon card with Stickled center, to cover a blub I couldn't correct. Probably didn't need to say that. : ) Anywho...these are my cards for Sharon's two challenges.


Stamps: Stempelglede Maribel, Crafty Secrets Flourishes.
Paper: SU! Kraft CS, DCWV Once Upon a Time, glossy CS and photo paper.
Ink: Ranger Archival Ink, re-inkers and Distress Ink.
Accessories: Corner punch, Martha Stewart/EK/L-Em leaf punches, Prima flowers, Stickles, Glimmer Mist, pear and daisy punches for home-made blue flower, quilling paper and tool.

Monday, January 25, 2010

Wishful Thinking

This is a long one. Sooo....Spellbinders is having their Design Team try-outs for the 2010 team. I love all the Spellbinders dies! I thought long and hard before doing this, mainly because there are so many wonderfully talented crafters and my chances of making the DT are uber slim. But Chuck and my kids gave me lots of encouragement and convinced me to go for it. Why not, right? Submissions were a card, a 12x12 scrapbook layout, and an altered item. Here are my entries.

For the altered item, I initially considered a notebook, but then I ran into (again) all my empty Cricut cartridge boxes. I have...a lot. Couldn't part with them after I came up with a more space-saving means of storage. So I attacked this box with some pretty paper from My Mind's Eye. The paper on the inside is a scrap from my stash, but it coordinated nicely. Once I got the box covered, out came the Spellbinder dies. I used the Fleur de Lis Pendant for the centerpiece, layering it with foam tape. The Fleur de Lis Borderabilities was used for the corner pieces, and to cover the ends of the box, which can't be seen in the pix. I used the Cameo die for the frame and attached it on foam tape to the pendant. The cameo is from Melissa Frances. I painted with some Pearl Ex in two different colors to bring out the detail. On the front flap I attached two of the Decorative Photo Corners die cuts, as well as a segment cut from the Borderabilities to use as an "escutcheon". The tiny lock is hanging from a large jump ring that I wrapped around the ornament before attaching; Its tiny key is attached to a chain that I looped around the pendant. The little legs I found last year at the stamp store just down the block. They look great!


Since doing this box, I've altered six more (will post later). Lots of uses for them. My daughter and niece already put in their "orders" for one. Like I said, I have a lot. : )
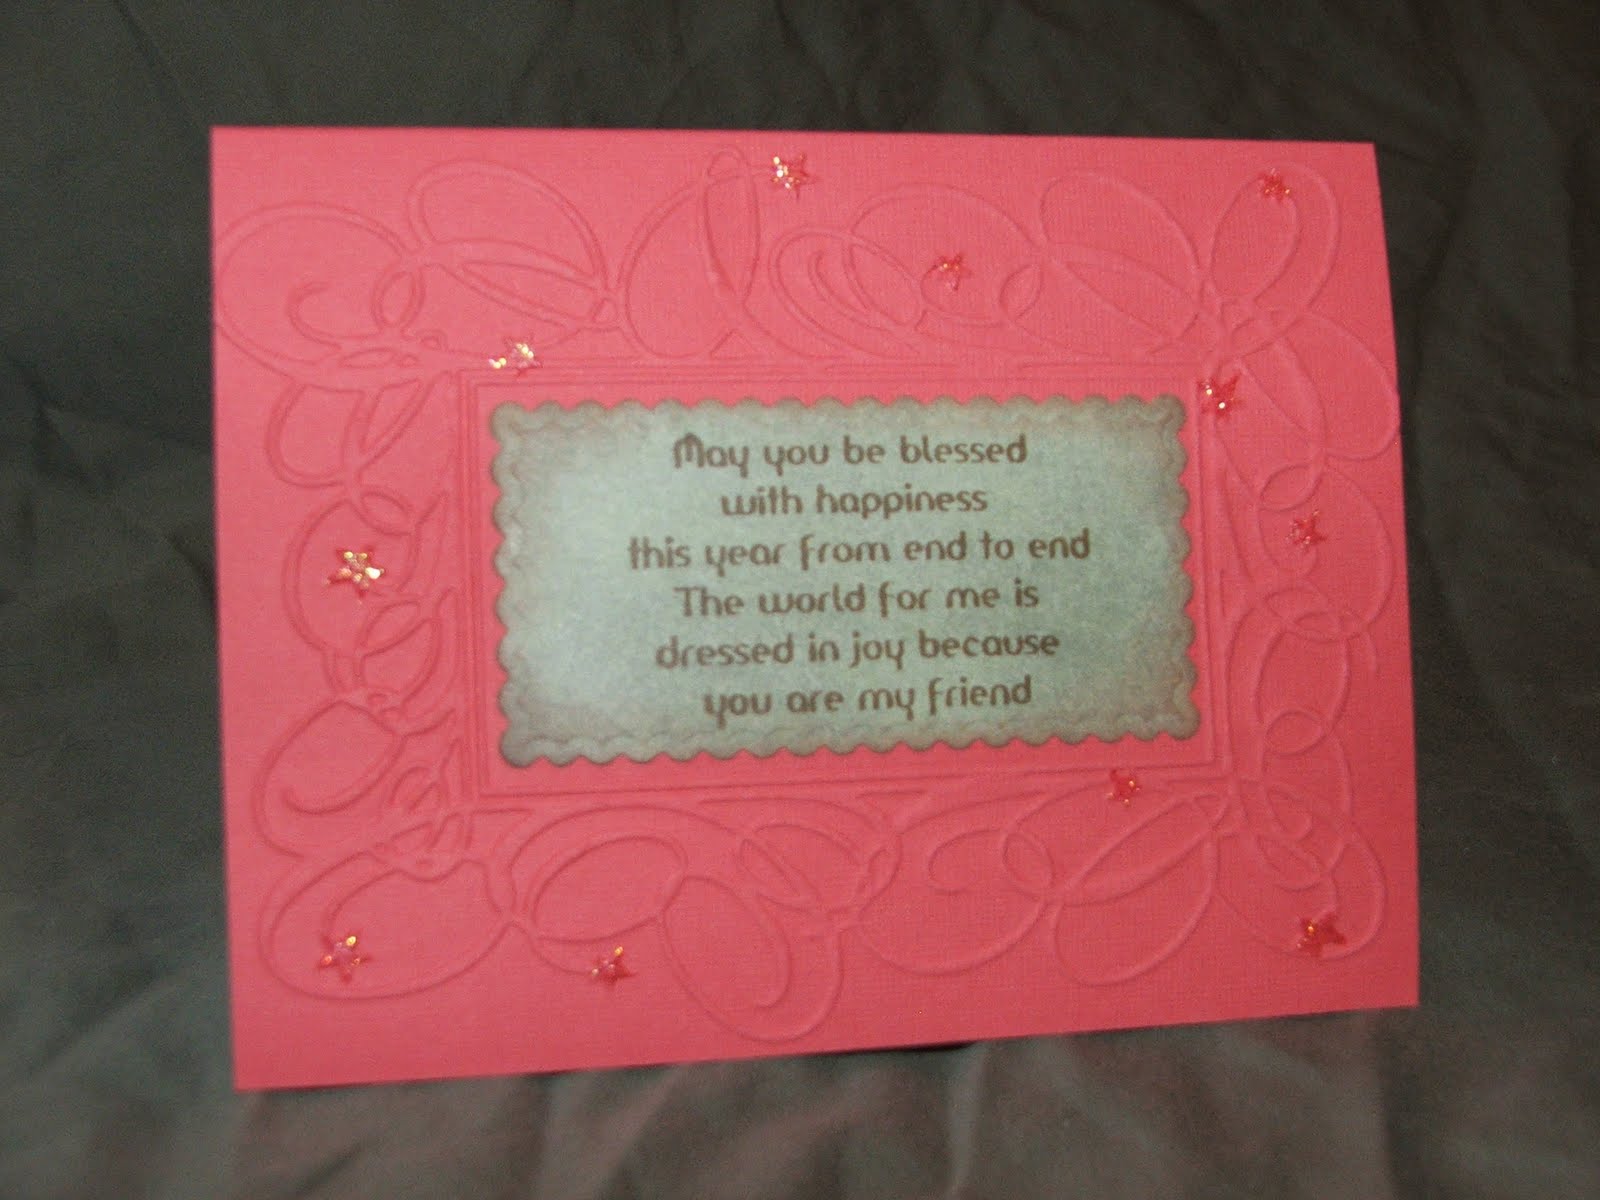
For the card, I had a set of "blanks" with envelopes that were sent to me by a blogging friend. I think they were by Stampin Up!, based on the envelope size I found on their site. Anyway, those fit perfectly into the box, so I gave them a dose of Spellbinders dies and made a note card set for myself. Used the Lg Deckled Mega Rectangles Nestabilities over the base, inked along the edges. Again used the Cameo die mounted on foam tape, decorated with Liquid Pearls and a couple flat-backed pearls. Symbology One ornament in the corner, and some flowers made with various sized punches, and an MS butterfly flying around. Used JustRite Special Occasion font for the monogram.

Okay, now for the scrapbook layout. Try to keep the laughter to a low roar. When I was looking for pictures to use, I came across an envelope with these old prom pictures and decided these were the ones for the layout. The base DP is from Anna Griffin, I think (sorry). I used Classic Frames die to frame pictures. The roses were cut from the Rose Blossom Edgeabilities, stenciled while still in the dies, as was the frame. For the "journaling", that was actually my handwriting from the back of the picture on the left...from April 1980. I scanned the back of the picture then printed it onto some DP and cut that out with a Curved Rectangles die. If you click on the picture you can probably read what it says. I was such a dork! I actually made that dress, and it was so pretty - but lots & lots of satin! I used JustRite Brayton font to stamp "prom" on the ticket, which was cut from Spellbinders ticket die. The flourishes are from the Symbology One die.
So there we have it. I won't hold my breath to make the DT, but what wonderful honor and experience that would be! I had a blast doing these projects. I have some more cards that I will post tomorrow. Have a few last tweaks to do. I've finally gotten busy playing with paper again! Thanks for stopping in. Love to read your comments!

Tuesday, December 15, 2009

Happy Birthday, Shelbie!

Today is my daughter's birthday! She is away at college in Vermont. Will post the card I sent to her later today. : )

Monday, December 14, 2009

My Niece's Birthday...

...was yesterday, and this is the card I made for her. At first I thought it was kind of busy, but I've made friends with it. :) She lives with us while going to college, but was working yesterday so I haven't seen her yet. Hope she likes it. From bottom up, used SU! CS for the base card. All of the DP is Basic Gray Eva. Misted the Spellbinders In Spades pendant with Glimmer Mist in two different colors, though that doesn't show in the pic. The sentiment is from JustRite Just A Note set, with one of the 2" borders around it. Cut out with circle Nestabilities, with a scalloped base. That was attached with dimensionals to the pendant, then added some Basic Gray pearls I got from Flourishes.

Stamps: JustRite Just A Note, and 2" Borders.
Paper: SU cardstock. Basic Gray Eva.
Ink: Colorbox Queues, Marvy Marker.
Accessories: BG pearls, Spellbinders, Glimmer Mist, Cuttlebug.

I covered these little tins with some DP from My Minds Eye. I used the little cutouts from the In Spades pendant, again misted with Glimmer Mist, and attached those to the tops, with a rhinestone in the center. Printed the contents on my computer, then cut those out with a Spellbinders label, inked while still in the die, then attached to the tin and added two little pink rhinestones. Attached ribbon around the lid. My niece and daughter love the teas from Teavana, and we have a store here, so I got some of their favorite for each of them, and that is what is in one of the tins. The other has German rock sugar to sweeten the tea. Also got her a tea maker to go with it.

Stamps: None.
Paper: My Mind's Eye.
Ink: Computer, Colorbox Queues.
Accessories: Spellbinders circles and label, rhinestones, Cuttlebug, tea tins, ribbon.

Thursday, December 10, 2009

Feeling Froggy

Maybe the title should say "foggy", because that's how my brain felt at first when a friend asked me to make a set of note cards for her adult step-daughter, who loves frogs. The specs were that she wanted "a frog theme; her favorite colors are black, green and turquoise...have fun!". Ooookay.

I don't collect frog stamps, having only one little bitty one that would not have worked. So I went here and found these digital images. Yes, I cheated. But it felt so right. lol. These are the cards I came up with, along with the box. This is a set of eight cards and envelopes. My camera and I obviously weren't on friendly terms for the card pix. Have no idea why, because the picture of the box looks great and everything was set up the same for the cards. Oh well, I think you'll get the idea. Here we go:

The box for the cards is the pizza box style, sized for A2 cards. Used black for the box. Embossed the turquoise panels with a Cuttlebug strip. Stamped her name with JustRite font and cut it out with Spellbinders Label, attached to panel. I printed the image as-is from pccrafter already colored, got it to the size I wanted, cut it out with Spellbinders Deckled Rectangles, as well as a black base. The only thing I added was some Twinkling H2O's to her swimsuit, though it's hard to see in the picture. Added a CB embossed strip to the front edge of the box, and decorated the corners with BG Euphoria paper cut with a corner adorner.


Now for the cards. Sorry they're blurry. They are each a little different, with 2 of each design in the set.


I attached the BG Euphoria strip to the turquoise base, then embossed with various CB folders. Cut out the images with different Spellbinders dies, sponged the edges with green then black on the very edge. Used two different JustRite fonts for her initial, cut those out with Spellbinders and gave them a base as well. I added Twinkling H2O's to the swimsuits in two images. Put lavender Stickles on the sunglasses (top one) - think that's my favorite, and also Waterfall Stickles on the water of third one. These ended up being a lot of fun to make after I got over the mojo hurdle. My friend really liked them and said her step-daughter would love them. Yay! :)

Stamps: JustRite Monogram stamps.
Paper: Basic Grey Euphoria, The Paper Studio CS.
Ink: Colorbox Queues.
Accessories: Spellbinders dies, Stickles, Cuttlebug folders, Twinkling H2O's, rhinestones.

Monday, November 16, 2009

A Little Catch Up

Well, I have been MIA again since August. Thanks to those of you who checked in on me during that time. Nothing serious, just super busy with massage therapy school and work. Graduated from MT school last Tuesday (YAY!). I am scheduled to take my State Board exam this Wednesday. Then just have to wait for the state to send me my license and I'll be open for business. Massage anyone? :)
Even though I have been absent from blogland, I have been making things. However, I forgot to take pictures, or couldn't find my camera, so obviously those things won't get posted. But here are two note card sets and a gift tag I made this past week, and my annual Halloween card I sent to my girlfriends (I know, very late posting this one).


I saw this Impression Obsession stamp and loved it! Stamped with Stazon and colored with Prismacolor pencils. Ribbon on the broom painted with Twinkling H2Os. Liquid Pearls on the bubbles. Image cut out with Spellbinders Labels Eight, added the tiny moon brad, and attached to grey CS base over narrow ribbon from Target $1 bin, and the cobweb MS border punch. I used black embossing powder on the Inkadinkado cat. Regular stamping of the sentiment from My Favorite Things in the upper corner.

Stamps: Spa Day from Impression Obsession, Inkadinkado Scary Cat, Out on a Limb from My Favorite Things.
Paper: The Paper Studio CS.
Ink: Stazon, Colorbox Queues, Prismacolor pencils.
Accessories: Spellbinders Labels Eight, brad, ribbon, embossing powder, Liquid Pearls, Twinkling H2Os.

This first set is a set of 8 cards, made with a Kraft CS base from SU! Background DP is by Olf Fashion Flowers by Fiskars. The bands are the reverse of that DP, and I embossed four of them with the textile CB folder. Monogram with JustRite stamp cut out with round Nestie and mounted on two layers of Spellbinders Labels Nine. Easy peasy, but so pretty.


Stamps: JustRite Monogram stamp.
Paper: Kraft CS from SU!, Fiskars DP, Pearl stationary paper from Office Depot.
Ink: Colorbox Queues.
Accessories: Spellbinders labels and nestabilities, Cuttlebug, embossing folder.

This is the gift tag I made to put on a bottle of wine I gave my frient Tommie for her birthday. I had printed out the sentiment "It's your party...wine if you want to", cut and embossed with Spellbinders Labels Five and inked all around it. Tied it to the wine bottle I had wrapped in purple and black tissue paper. Boring! Then I happened upon this post by Donna and just had to make those grapes! Not sure how I didn't notice that one embossed grape got into the bunch, but that's okay. It looked really great, and Tommie loved it! I used three leaves from a Cuttlebug die, and one Spellbinders leaf. The grapes are just layered oval Nesties. I attached the grapes to the tag and tied it to the bottle with some raffia.

Stamps: None.
Paper: CS from Hobby Lobby.
Ink: Computer.
Accessories: CB leaf die, Spellbinders leaf, Labels Five, and oval Nestabilities, foam tape, raffia, eyelet.

Last but not least is this set I made for Tommie's daughter, who turned 21. Their birthdays are one day apart, and a bunch of us got together for a fun birthday surprise for these two. I used two different colors of CS from SU! for the base of these cards, embossed with CB Victoria folder. I don't know the name of the orange/cream CS, it's scraps in my stash I've had for a while. Those are the bands and the background on the box. Again, Spellbinders Labels Five layered under JustRite monogram cut out with circile Nestabilities.

Stamps: JustRite Monogram.
Paper: SU! cardstock, The Paper Studio CS, ??DP from my stash, Pearl stationary paper from Office Depot.
Ink: Colorbox Queues.
Accessories: Spellbinders Labels Five and circle Nestabilities, CB Victoria Folder.

Friday, August 7, 2009

Birthday Card for Tyler

Yay! Finally I managed to sit down and make a card! This one is for my son's 16th birthday, which was a couple days ago. Happy birthday Tyler!!! I saw this tri-shutter card several weeks back when I was blurfing (that word makes me giggle, sounds like a physical reaction to bad food ~grin~) before I went to sleep. Had to give it a whirl. My son loves deer and being outdoors, so this is what I came up with.

I stamped the SU! Nature Silhouette stamps with Versamark and then embossed with black EP. The background is sponged with several different shades of Colorbox Queues, then the image was cut with square Nestabilities. The DP is from my stash, some I got at Hobby Lobby a good while back. The sentiment was printed on my computer, cut and embossed with Deckled Rectangles Nesties, then sponged. The "believe" is from Making Memories. It is aluminum mounted on foam. I colored it gold with my gold leaf pen before attaching it. In trying not to add too much bling since this is a masculine card, I controlled myself and only added the one antique bronze corner brad to the image, and a few tiny flat back gold beads to some of the corners. Tyler really liked it. : )

Again, I would like to say thank you to those of you who have checked in on me via e-mail over the past months of my absence from blogville. I went from job hunting and getting doors slammed in my face, to going back to school for massage therapy and then started a job middle of June. Love the job, love doing massage therapy! I will graduate from the school in November. I am working for a chiropractor, then when I get my licence I will be doing massage therapy for her, so will be a seamless transition. I am hoping to get more regular again with making and posting cards, though will not be attempting to do as many challenges as I was before. I sure have missed playing with paper!

I have enjoyed my kiddos this summer. My daughter will be leaving this coming Monday to head back to Vermont for her second year of college. My son has been busy with the summer ROTC training program at his high school, and will be starting his junior year in a couple of weeks.

Stamps: Stampin' Up! Nature Silhouette.
Paper: Paper Studio CS, and DP from Hobby Lobby.
Ink: Colorbox Queues.
Accessories: Corner brad, Nestabilities, flat back beads, Making Memories Words.

Wednesday, April 22, 2009

Thanks For Checking In

Never thought I would be missed here in blogville, but I have received quite a few e-mails over the past couple of weeks asking if I am okay. I have to say, I am very touched and the e-mails are appreciated. I am okay, just still missing my mojo. Actually just flat out no desire to create anything, which is a very strange place for me. Even my sis-in-law and Chuck have been teasing me about my lack of card making. :) Overall I think it is simply stress. Not that stress is simple; it stinks. lol. Losing my job and being the sole income producer kind of escalates stress. Very difficult to find a job in this icky economic climate, but I'm out there hunting.

As a bit of a tension reliever, my friend Deborah (also jobless) and I went to Enchanted Rock last Wednesday to "climb the rock". It is one of my favorite places to go, just to get away for a little bit, find some peace. It is remote, very quiet, beautiful out there. We took bottles of water and a picnic lunch. We laughed and goofed around as we were going up, took some really silly pictures, and at the top we sat down and ate our lunch. Then we laid back on the rock to relax, talked and watched the clouds go by...you know doing that hallucinating thing where you think you see a shape in the clouds. Couple of times we actually saw the same thing. heehee! We eventually climbed around on a couple outcroppings of rocks, then went back down. By that time we were hungry again, so on the way back through Fredricksburg, we stopped and had lunch at a German restaurant. We decided that day was the perfect "prescription" for stress relief...climbing Enchanted Rock with someone who makes you laugh. :)

Another bright note - I have some travels coming up in the next two weeks. I leave tomorrow to go to Vermont to see my daughter and participate in the Relay For Life that is being hosted at the university she is attending. I am SO looking forward to seeing my sweet Shelbie! I have missed her like crazy. I will return Monday from Vermont, then turn around and head to Daytona Beach Friday for the JROTC National Competition. My son, Tyler, is on the varsity male JROTC drill team and Color Guard, and this will be his second year to compete over there. I am so proud of how well he has done. After the competition we have a "free day" at the beach, and all the kids get to run around down on the boardwalk and play on the beach. This will be my fifth trip over there for this competition (my daughter was in JROTC as well and competed at Nationals, and last year both my kids were competing there).

Hopefully these trips will kick start my mojo. Thanks again to those of you who checked in on me, and I hope to be back to papering my blog soon. :)

Thursday, April 2, 2009

Just For Fun

I had posted a while back that I was starting an exercise program. I have been going to the gym each morning with my son, Tyler. We play a couple games of racquetball, and we have a lot of fun, then workout with the weights. While he showers and gets ready for school, I hop on a treadmill (I shower when I get back home). Well, I had a bit of a learning curve on one of the treadmills and had no idea I was being watched, much less videotaped. Here's that video clip. Boy is this embarrassing!

Haha. Okay, so this was all in fun. The arm didn't actually break off. hee hee! I get the giggles every time I watch this. Hope you enjoyed it. : )

I have no idea why, but I have had no desire to even go near my crafting table since my last post. I have checked out the challenges I usually do, but nothing. I even got some happy mail which included some new Whiff of Joy and Sarah Kay stamps. Hope this doesn't last long.